What got me started down this thought path was the difficulty in making so many small patches and having the result turn out smooth. I am not a welder. I plan to teach myself how to weld with this project to practice on. With so many rustly spots so close together I am afraid the result will look like a cotton shirt that didn't get ironed.
As I looked more closely at how this part of the car is put together I began to have doubts. The entire rear panel is one piece, with several shallow but tight horizontal folds running side to side. It is a compound curve, with a lip along the bottom. Easy to make with a factory stamping die, difficult even with proper sheet metal tools (a beader and an English wheel come to mind). Lacking such tools and the associated skills, such a piece is beyond me.
I recalled a conversation I had with one of the guys at the shop back when I was exploring the front. Tom's advice was not to try to make perfect welded in patches -- let's call that artisian style body work. His suggestion was to make a "pretty good" patch, then blend it in with bondo. I decided to forget the dream of a perfect replacement and go back to making as small as possible patches. I keep promising myself that when it comes to bondo I will show more restraint that the previous owner.
One reason this approach should work well for me is the complete lack of accident damage. There is no practical way to repair a crushed rear end without splicing in a new section, but rust holes can be cut away without destroying the overall shape.
The challenge that revealed itself today is that the rear end rusted along the joint with the trunk floor. The edge of the trunk floor is flanged upwards and the rear end is welded to it. Dirt and moisture collected along this joint. As I cut away the rust I found that a lot of the weld is still good, but it needs to be removed to create clearance for the new skin. I'm thining maybe I need to buy a corser grinding wheel.
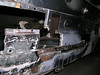
More rust cut from rear end below red light and extending right. Ground away bondo on remaining metal below tail light, looks like old repair using lead.
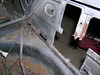
Exterior view showing rust at joint with trunk floor. Rear section is one piece with several shallow horizontal bends. Repairs will be built up. Area visible through cut-out is curved wall of spare tire well.
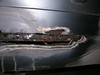
Rusted area cut away from trunk floor. Need to grind away places still stuck together to provide clearance for patch.
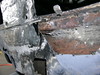
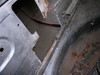
Inside view of bumper attach point. Note doubler, might not be original. Curve of spare tire well just visible. Trunk floor flange bends up, rear panel skin welded to it.
Inside view, more visible. Angled toward left side of car.
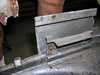
Inside view angled toward right. Rusty slot is above today's cut out area, which was below the trunk floor.
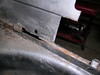
Close-up of rusty slot above trunk floor flange.
No comments:
Post a Comment