Monday, December 27, 2010

Happy New Year!

Despite taking some time off these past two weeks have been crazy busy. I did spend some time working on the Caravan's windshield wipers, but no work on the E9. With New Year's Day falling on Saturday I doubt anything will get done for another week.

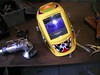
I am writing this on my Android phone using a blogger app called Bloggeroid. It uses Picasa to store photos, which will require me to change my habits. I'll see how it goes.


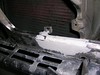
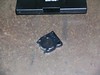
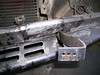
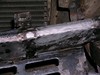
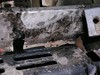
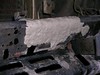
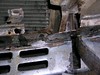
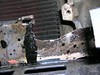
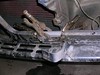
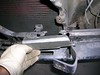
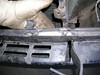
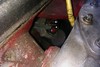
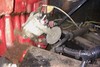
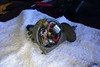
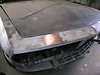
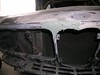
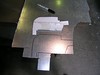
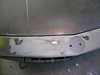
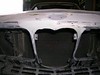
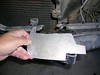
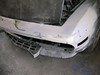
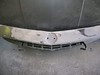
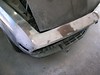
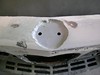
The initial problem was the motor not working. It was slow and noisy when I installed it last year. This time it was sitting in a pool of water -- the drains for the plastic tub were plugged. While replacing the motor I discovered that the ball joint at the end of the crank was really stiff. Maybe that is why the last motor was so noisy.

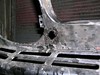
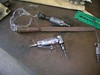
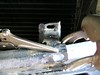
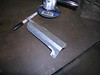
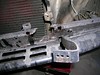
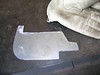
Nobody has a suitable replacement ... the dealer did not know what parts I would need, so I took it apart, cleaned it, and greased it up with axle grease. Still not put back together.

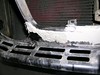
Also need to fix the van's radiator fans.

Sunday, December 5, 2010

Still not quite winter

I am writing this on Sunday because Saturday was too crazy. But I did work on the E9.

BMW101204-01 BMW101204-02

Started off sanding down the POR-15 Epoxy Putty applied last week to fill in the welded patch. Not much to say except it takes time, even with #40 paper. Tough stuff. Eventually I could see I had some low spots, so I decided to use TECHNIFILL, because I didn't need much thickness, and it sets fast.

What I finally concluded is that the hardener has, well, hardened. After a lot of kneading it still came out a thin blue liquid, when it used to look like blue toothpaste. But I could feel a big lump in the tube. And, like the last couple batches, it was slow to harden.

BMW101204-03 BMW101204-04 BMW101204-05

While waiting for the filler to set I used my CP grinder to expose the rust damage along the lower RH grill opening. One spot might need a welded patch. After that I worked on the top of the center grill opening, getting the opening equal on both sides. I discovered the the RH side needed to be built out a little more, so I mixed up what was supposed to be a hot batch of TECHNILL and put some on top of what was still not set. Hopefully next time will not begin with removing a bunch of half-dry filler.

BMW101204-06

The LH column of the center grill opening is pushed back a little. I tried bending and hammering, but the "U"-shaped cross sections makes this difficult. Rather than risk distorting or breaking this delicate piece I decided to try building it out with Epoxy Putty. After that I treated all the newly exposed areas with Marine Clean and Metal Prep.


Saturday, November 27, 2010

More lower nose

Another short day, had to pick up our Christmas tree this morning.

BMW101127-01

Last time I covered the welded patch with POR-15 Epoxy Putty. Today began with sanding it down. For starters I used my CP grinder, then switched to #50 paper on a sanding block. Tight spot, so it took longer than normal.

BMW101127-02

What this revealed was a low spot to the right (of the car) extending to the start of the vertical piece. I decided I had to fill this, too,but before that I had to patch a small hole with fiberglass and POR Patch. Too my surprise, my brand new tube had already kicked off. Well, I bought it a couple of months ago, I just opened it today. Still, that was a disappointment. What came out was really thick, but soft enough to work into the woven glass.

BMW101127-03

With the hole patched I opened up my new Epoxy Putty, which was still good, and filled in the low spot. Naturally I stuck my finger in the POR-15 and now have black finger tips.

Saturday, November 13, 2010

Patch welded and filled

BMW101113-01

From time to time an interesting car turns up at the shop. Today it was a very clean 1967 Ford Mustang, driven by a guy about my sons' age. I hope he did not get tired of me yakking about it reminding me of my youth. I was a senior in high school when that car was first sold.

BMW101113-02 BMW101113-03 BMW101113-04 BMW101113-05

I replaced the battery in the E-9 wall clock, and in my Miller welding helmet. Both were a success. I also changed the bulb in my work light, but it still does not light up. How much can go wrong with a halogen light? Time for a new one already?

BMW101113-06

With the helmet working I got right to welding. Everything went perfectly except for the grill mounting tab. I had to do it three times before it stuck to the patch, drilling and grinding through the bad weld each time. Must have wasted thirty minutes on that one spot weld. It did end up rock solid.

BMW101113-07 BMW101113-08 BMW101113-09 BMW101113-10

After grinding I wire brushed everything, especially the exposed weld-thru primer, then just as a precaution applied a generous coat of POR-15 Prep and Ready. When that was dry I filled everything in with POR-15 Epoxy Putty, as usual.

Next week we have a gamelan performance, so I may not make it to the shop.


Saturday, November 6, 2010

Ready to weld, but helmet battery died

I would of had the new patch welded in were it not for the battery in my helmet being dead. What a surprise when I struck a bead and the glass did not dim. My eyes hurt for hours.

BMW101106-01 BMW101106-02 BMW101106-03

I decided to open up and smooth out the opening a bit, one cut on each side. ( Compare with this .) When the shape was finalized I drilled holes to weld through. Two were where the electric drill could not reach, on and just below the grill mounting tab, but I was able to use a right-angled die grinder and a tapered file. Took a while, but turned out rather well.

I washed everything with POR-15 Marine Clean and ran a wire brush in the die grinder along the edges and over the holes to remove all the paint. Painted the inside of the patch with weld-thru primer.

BMW101106-04 BMW101106-05

I left the patch clamped in place so next time I can start with welding in on.

Saturday, October 30, 2010

At last, back to patch making

After weeks of distraction I finally got to work on the E9 today. I did get a late start because I had to help my wife with her bike, and I am still constrained by short hours, but I did get something done. Even a little progress is better than no progress. What I need is more "visual progress," something dramatic. Like painting that car ... imagine that!

BMW101030-01 BMW101030-02
BMW101030-03 BMW101030-04 BMW101030-05

In the last E9 session I had started working on the next patch, on the lower edge of the LH grill opening. It was rough cut outline, still flat. Today was all about bending and trimming. Along the way I had to determine how much warp was in the body and work that out with a hammer and dolly. I got to where I was ready to weld, but experience has taught me two things: 1) do not weld at the end of a session when you are tired and rushed, and 2) with fresh eyes I will spot more places where the fit is off and needs a tweak. So, next time will begin with touch-up fitting and shaping, then move into welding.

As an aside, the places where I left steel naked along the top edge have still not started to rust. Naked, but treated with POR-15 prep. I see where they changed the name to Prep and Ready. Whatever they call it, it's great stuff.

Saturday, October 23, 2010

The Lotus runs again!

I was right. I had the static timing completely wrong. Probably because I was "thinking" about the distributor going the other way. Sort of like when you are trying to loosen a bolt upside down. This puts the points on the wrong side of the cam lobe, which puts the body out of position, which is why the primary wire connector was close up against the intake runner.


The ironic thing is, setting up the distributor on this engine is easy. Pull the plugs, raise the rear end, put a 4x4 under the LH wheel and lower the rear so that the tire sits on the board. Select 4th and use the RH wheel to turn the engine. Stick a clean Craftsman screwdriver into #1 spark plug hole and turn until screw driver starts to rise. Turn the screw driver around so that the end of the grip is sitting in the spark plug hole and turn the wheel some more. If air chuffs out of the spark plug hole #1 is coming up on compression. If not, watch the large alternator drive pulley and turn the engine until the pulley has gone half way around. Looking at the flywheel timing mark, set the engine at 9 deg. BTDC.

I position the distributor body with the primary connector at about 2 o'clock and the notch on the shaft at 12 o'clock. This puts the #1 lead at 6 o'clock. Connect a continuity meter to ground and the primary connector, then turn the distributor body until the points just open. Snug down the clamp and double check buy turning engine once around and slowly up to where the points open and check the timing at the flywheel. Repeat until it's right. DO NOT start with more than 9 deg. static advance or you could find yourself in the pre-ignition zone. DO road test and listen carefully for pinging.

The car started right up and flew around the test road with plenty of power. The idle was up, just over 1500, so I dropped it down. The thing about old ignition systems is that the deteriorate slowly. I am the kind of guy who will drive the car as long as it runs, and with this car just being a little off means it won't run. In other words, it needs regular attention.

Saturday, October 16, 2010

Got Lotus spark, but no Lotus love

Last week I checked for spark without turning on the ignition. The first thing to do today was to repeat that test, the right way. Still no spark.

Lotus101016-01 Lotus101016-02 Lotus101016-03

Not surprised, I jacked up the rear end, blocked the LH wheel and with the trans in forth and the spark plugs out I turned the RH wheel until #1 was coming up on compression and the flywheel mark was just past the 10 deg mark, around 8 or 9. Then I pulled out the distributor cap and rotor. Both looked perfect. I pulled the distributor and noticed right away that the point gap was nearly gone. Not from badly worn points, but more likely from wear on the plastic cam follower.

After resetting the point gap to .015 in. I installed the distributor, but during an initial position setup discovered the points were not making good contact -- my multi-meter beeper was reluctant to beep as the points closed. Out came the distributor. Removed the points and sanded with #180 wet/dry even though the points were not burned or pitted. After that they were fine.

I had a hard time getting the distributor body oriented the way I wanted. I ended up with the ignition lead way up near the intake runner, where it usually is around two o'clock. I recall having a similar problem the last time I did this, coming out of restoration, and that the cause was I was on the wrong side of the cam lobe. At this point I was running out of time, so I tested for spark and had it, nice and strong. I figured either it would run or it wouldn't, so I put in the new NKG spark plugs I picked up at Larry's and gave it a go. Not a sputter. Net week begins with checking the static timing setup procedure.

Saturday, October 9, 2010

Lotus - Not the carbs

It's rough only having three hours to work Saturday morning. The last time the Lotus ran poorly it was one carb -- the rear one -- with a stuck air piston. The difference was that this time it quit cold, while last time it limped along on two cylinders.

I pulled the spark plugs and they all looked wet. #1 looked especially bad, but not terrible. I cleaned them up but I'll look for new ones this week. N7Y.

I went through the Zenith Stromberg carburetors and they look perfect. Pistons dropped without sticking, no tears in the diaphragms. Definite odor of gas on the needles. Very clean.

In order to use the shop's remote starter switch I had to make an extension out of a quick disconnect terminal, because the Denso starter has a male terminal inside a hard plastic housing where the alligator clip on the switch couldn't reach. I should buy one and modify it. Anyway, without plugs the starter turned nicely on the car battery.

I stuck a phillips screwdriver into the #1 spark plug lead, held it close to one of the cam cover studs, and cranked. No spark. There was not enough time to raise the rear end, set TDC and tear into the distributor, so I gave it a quick wash, pushed it back outside and put on the cover. Besides, it could be the vintage 70's MSD box. Or the tach wiring. The coil. It's all about elimination, one step at a time.

It was not until later this evening that I realized that I forgot to turn on the ignition switch while checking for spark. Doh! Fooled by the remote starter. So the spark status is still undetermined.


Sunday, October 3, 2010

Great support from my pit crew

This will be a very odd entry. To start things off I changed my profile photo, from my Samurai Champloo character to a current, very plain head shot. At least it looks like me.

The big news is a schedule change. The shop will be closed on Sundays, leaving me only Saturday morning to work on cars. I'll just have to make the most of it.

My wife's Toyota Camry wagon finally died. I have been saying for months that the next big thing to go out will be the end. It turned out to be the steering rack, which I replaced once already. The reason it failed was the poor quality aftermarket parts that are available. The windshield wiper motor I replaced recently in the van is failing, same story. Hard to find quality parts these days.

For a replacement I have been focused on two cars, a BMW 5-series wagon, or a Honda Element. My wife was not excited about either, which is why we put off replacing the Toyota until it actually died. The key criteria was that she could put her road bike inside, without taking it apart, and she did not want a van or a big SUV. This car functions as our "nice" family car, and I thought it was time we showed up looking less like the Beverly Hillbillies.

The Toyota died Monday before last, at Costco. I had it towed back to our place for troubleshooting. When I determined it was the rack I jumped on Craigslist and confirmed what I already knew, there were no suitable 5-series wagons for sale. A nice one in Kona, but too much hassle to bring it home (you can't drive across the ocean). A couple of nice Elements, one real pretty but manual and I want an automatic. Then I stumbled upon a Subaru Legacy wagon. My wife has always had a thing for Foresters and the Legacy wagon. 2001, a little older than I wanted, but when I went to see it I could tell at once that this was an extremely clean, well kept car, worth every penny. Got a great deal on it, too, so all the better.

I decided to donate the Toyota to the shop. Yesterday was the day to tow it in, which they do for free. The Lotus needed a safety check, so my first Saturday would be getting those things done.

The last time I drove the Lotus I noticed the brakes were dragging. This has always been an issue with this car, due to a problem with the design of the rear brakes. The fix is to ratchet back the adjusters by hand. I did that, got the paperwork in order, and drove out to the shop. Passed the inspection without a hitch. The tow truck was supposed to follow me home, hook up the Toyota, and that would be my day. Just as we were about to get onto the freeway the Lotus quit. I rolled to a stop on the shoulder with the tow truck behind me, and after a quick check to make sure the primary wire had not fallen off of the distributor (that has happened before) and that the Holly fuel pump was still running (it was) we towed it back to the shop. It was funny to see; we left with the tow truck following me and returned a few minutes latter with the tow truck towing me.

I am almost certain the problem is with the carburetors. The air pistons get sticky. Old age. I'll figure it out next Saturday.

We did get the Toyota, so my wife can park in our stall, but the Lotus is still at the shop and nothing got done on the E9. The strange thing is I had my phone with me but never thought to take some pictures of all this. I should hand in my journalist card.


Sunday, September 19, 2010

Feeling better, worked hard on nose and new grill patch

At the end of last week's shortened session I did not apply any filler, so that is where I started today. In between filling and sanding I worked on the next patch, at the bottom of the LH grill opening.


BMW100919-01 BMW100919-02

BMW100919-03

I finally got the area around the right-front corner of the hood high enough, and the run towards the center smooth. It will take primer to see if it is still wavy. The area around the RH side of the center, forward facing, is a lot better now, but it will need several more rounds of sand-and-fill.

BMW100919-04 BMW100919-05 BMW100919-06

I took the patch as far as bending, saved that for next time. The tab at the upper left corner (as viewed) is to reinforce the grill bracket, which has almost rusted off.

BMW100919-07 BMW100919-08 BMW100919-09

Next Sunday is the Honolulu Century Ride, which I plan on doing as long as I feel like it. By then I think I'll be just good enough, which is all I need.

Sunday, September 12, 2010

Sick day, just a little done

Last week I came down with a flu bug. I've had worse. Previously I had decided to attend a friend's music school recital, so I got a late start on the car and quit early.

As if that weren't bad enough, the last batch of TECHNIFILL I applied last week did not quite kick off. Sanding it just produced balls of sticky stuff that clogged the sandpaper. It all had to come off.

I think I finally have the height right. There is a tricky high spot just to the right of the roundel recess. Still need to fabricate the roundel recess shaper.

The next patch should be easy. Two or three parallel bends. It will need to extend to reinforce the grill mounting tab.

This is how it looked at the end of the day, and a detail of the roundel recess.

BMW100912-01 BMW100912-02 BMW100912-03
BMW100912-04