Saturday, April 30, 2011

Lotus RH suspension mostly done

Last week was the UH Manoa Gamelan concert so no time to work on cars. On balance, Dave Bean shipped my shock and anti-roll bar bushings, so today I had all the big stuff. I still only had three hours today, so if I want the car on the ground in time for All British Car Day I need to take a few days off from work.

Recently I bought new grease to pack the hub bearings, but I still needed gear oil for the trunnions and new zerk fittings, so I stopped at Redline. They had the oil, but no zerk fittings. Why is it always little things are what hold you up?

Lotus110430-01 Lotus110430-02

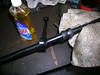
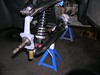
The guys on the Europa mailing list recommended liquid dish detergent to lube the bushings, so I brought along some. Hard to find plain dish soap! I expected a battle but they went together easily. I gently clamped the bar in the vise and used the jaws to backup the bushing.

While working on the bushings I noticed the angle of the bend at each end was different. Not the little bend, the big one. Probably a side effect of the crash impact. I won't be able to set it straight until the shocks are in place, because I need to know the distance between the bottoms of the shocks where the bar attaches.

Lotus110430-03 Lotus110430-04

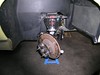
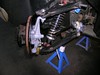
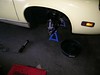
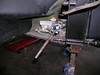
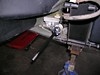
I finished assembling the RH upright -- the steering link and backing plate. Greased up the hub bearings and added the hub. Couldn't do the tie-rod because I still don't have the steering rack bellows.

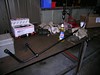
Since I got the new shock I thought I'd spend what little time remained getting out my home-made spring compressor. Made an interesting discovery. I have to compress the spring to even get the top mount point even with the top of the spring, but the nylon strap will not fit between the spring and the mount. Catch-22. That will take some thought.


posted from Bloggeroid

Saturday, April 16, 2011

Lotus RH upright

It's amazing what you don't know.

I was talking to Ken at Dave Bean about my springs, and he said that at 10 in. I was already low. Then he asked me if I had tightened the inboard bolts with the suspension in static ride position. I knew I had to do that with the rear lower links, but not the front. Duh. That saved a bunch of money!

Still waiting for parts (shock and anti-roll bar bushings) but I went ahead and assembled both uprights. Attached the upper ball joints, and lower trunnions, with new rubber bushings for the trunnions. Coated the inside of the trunnions with gear oil -- same Red Line 75W90NS I use in the transaxle. Applied light grease where upright contacts rubber seal. Note: trunnion with LH thread goes on LH side of car. Why would that matter, with so little rotation? Another note: fill trunnions before putting back on the road.

Removed the old brake hose, which was a fight. Loosened the lower inboard bolt, so that suspension will settle.

Lotus110416-01 Lotus110416-02

Installed the RH upright. Used my hardware on the ball joint instead of what came with the kit from Moss, because mine looks like better quality. Did use their bolt on the bottom, because for whatever reason I had used the original the last time I had it apart. Would have done the whole thing but the steering links needed another coat of paint.

Saturday, April 9, 2011

Lotus tie rods

Yet another short session today. But the good news is that the shop was even open.

First order of business was to remove the tie rod end bearings. Easier said than done. I had to use a really big crescent wrench across the top and bottom of the bearing and a long 3/4 open end on the lock nut to break the nut loose.

BMW110409-01 BMW110409-02

In the midst of that battle I was distracted by the arrival of a very nice BMW, a Z4 M coupe. I offered to trade for my E9 but the owner turned me down. Just as well. The trunk is too small to store the junk in my van.

Before I forget I need to record the number of turns to remove the rod end bearings. LH 22, RH 21.5. Surprisingly similar.

Lotus110409-03 Lotus110409-04

I wanted to remove the tie rods for painting and to lube the ball and socket, but the RH was so tight (yes I folded back the locking tab) that I decided it was not worth the risk of breaking something else. I ended up cleaning and painting in place, after slipping a sheet of plastic over the ball and socket to keep it clean. Same for both sides. After studying these photos I realize I should touch up the frame here, too.

posted from Bloggeroid

Saturday, April 2, 2011

Lotus parts painting

No photos today because nothing photogenic happened. Cleaned (media blaster) the other caliper mount and both backing plates. Sanded the LH upper links. Shot everything with Rustolium Primer followed by grey or black depending on the part.

Discovered I need new steering rack boots. Could not loosen tie-rod ends, shot with PB Blaster. Need to pick up small can of black Rustolium.

posted from Bloggeroid