Sunday, March 28, 2010

Lotus wiper, E9 nose

Lotus100328-01 Lotus100328-02 Lotus100328-03 Lotus100328-04

Started off working on the Europa's RH wind shield wiper arm. The rivet holding the solid outer part to the formed sheet metal inner part broke, due to corrosion. This released all tension of the spring. Once I had the old rivet drilled out I went shopping at Redline and Checkers, neither carries rivets. Finding one could be difficult.

BMW100328-01 BMW100328-02

Back at the E9 I marked a low spot at the LH front corner which has some rust damage that could be repaired with fiberglass applied from the outside. I thought I might get a layer on today, but time ran out and I think I'll wait until after the welding is done.

BMW100328-03 BMW100328-04
BMW100328-05 BMW100328-06

The rest of the day was spent doing to the RH nose what I did last week to the LH side. I tried a new flapper wheel sander on the CP grinder; it cut through bondo really well but wore out rather quickly. Removal of the side marker light revealed more bad wiring, as I have come to expect. Some PO even used a tap to splice one of the light wires. No wonder the electric gave me so much trouble!

BMW100328-07 BMW100328-08 BMW100328-09 BMW100328-10

BMW100328-11

The big disappointment here is the bad fit of the nose section at both sides. Looks like damage repair, a poor job of splicing on a new nose. I'll just have to make the best of it.

Sunday, March 21, 2010

Treating the box-in nose

BMW100321-01

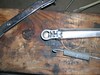
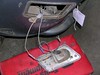
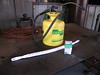
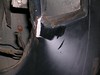
During the week I picked up some things to help treat the hidden boxed-in sections at the nose. I already had a pump garden sprayer, which I knew would be useful for rinsing. I bought a roll of gauze, the idea being to tie some knots every six inches or so and pull it, soaked in whatever I was applying, through the panel. I also found a long "bottle" brush, billed as a facet cleaner. It had handles at both ends, and they were too big to get into the tight spots, and since I did not need it I cut it off.

BMW100321-02

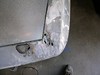
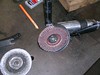
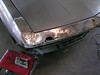
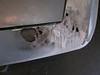
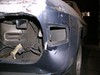
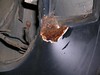
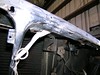
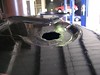
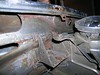
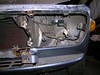
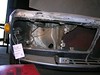
I decided to get started on the front LH corner, although the RH side would have been equal. Applying what I have learned from working on the back end, I began by opening up the large rust hole using a rotary file in the die grinder, working back to thick, sound sheet metal and a smooth opening. I will decide of the final shape when I make the patch; for now I just remove the minimum.

BMW100321-03 BMW100321-04

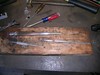
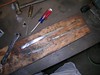
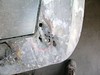
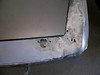
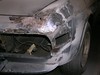
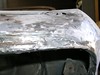
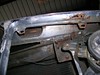
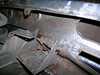
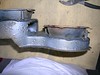
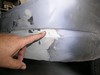
Outboard of the hole I had left some bondo and this was the time to get rid of it. When I realized how much this resembled the rear I decided to take pic part way through the removable process. I continued on around the top of the fender; at times the bondo was as thick as my grinder's wheel. Too bad, because it softens the original lines. I finally got back to a normal finish just aft of the side marker light opening.

BMW100321-05 BMW100321-06 BMW100321-07

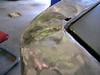
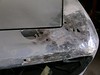
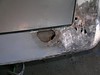
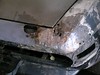
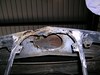
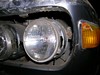
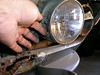
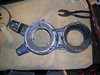
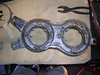
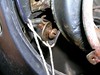
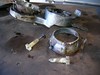
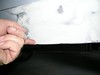
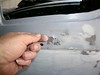
Speaking of the side light, I removed it to get at the bondo and discovered rust under a spot at the lower forward corner. In the process I realized a challenge to restoring this car. The side marker light will need as least a new rubber mount between the fixture and the body, a rubber gasket between the amber lens and the fixture, and a crack in the lens repaired. Ideally the amber lens should be replaced, as it is faded. If this were a really old car these things would likely to have been hand made, and therefore more readily repairable. With my Lotus, these things are standard bits taken from mass produced cars and are still available as new.

BMW100321-08 BMW100321-09 BMW100321-10
BMW100321-11 BMW100321-12

What I discovered under all that bondo was some uneven lead work. There is one high spot that might explain why the bondo was so thick. Hard to say if this was collision repair or original construction. Probably a little of both. As with the rear, I plan on reducing the filler thickness as much as possible.

BMW100321-13 BMW100321-14

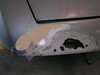
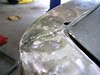
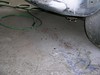
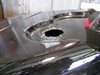
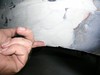
I took another look at the big hole I started with today and decided it needed a little more work. Then I got underneath with my wire brush in the die grinder and removed as much loose stuff as I could reach.

BMW100321-15 BMW100321-16 BMW100321-17

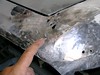
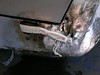
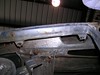
Finally it was time to try out my new brush, and it worked great. I used it to clean with POR-15 Marine Clean, which I brushed on the traditional way everyplace else. Then I rinsed everything with water from my sprayer. After everything was dry, helped along with some compressed air, I put a bit of Metal Ready in the sprayer and sou it all over the underside and inside the boxed-in area. Messy but effective. I won't paint with POR-15 until after the patches are welded in.


Sunday, March 14, 2010

Started working on front end

Started working on the front end, mostly to gain momentum. Lots of photos documenting headlight bracket removal.

BMW100314-01 BMW100314-29 BMW100314-30

First thing to do was finish tank. Removed tape covering openings, sanded paint edge to feather, did standard Marine Clean - Metal Prep routine. Painted with POR Patch because area was so small. Applying POR Patch next to POR-15 paint revealed Patch goes on thicker.

BMW100314-04 BMW100314-05 BMW100314-06

BMW100314-07 BMW100314-08

I spent some time inspecting nose area from underneath, and planning how to treat boxed-in area under nose. The upper, exposed sheet metal has some rust-throughs. Three ares will need welded-in patches. But surrounding underside will need treatment, and access is partially blocked by doubler. As see in these photos, the doubler has holes, and on RH especially has rusted away. May need reinforcement. Plan is to wire brush what can be reached and use rolled gauze bandage with knots tied to apply Metal Clean and Metal Prep. Will also use my garden sprayer. Painting will be messy!

BMW100314-09 BMW100314-10 BMW100314-11

BMW100314-12 BMW100314-13 BMW100314-14 BMW100314-15

BMW100314-17 BMW100314-18

Work on front end continued with headlight removal. Original screws were rusty but came out easily. Three wrong size replacements were rusted in tight. PB Blaster got two, one had no slot and had to be ground off.

BMW100314-19 BMW100314-20 BMW100314-21

BMW100314-22 BMW100314-23

BMW100314-24 BMW100314-25 BMW100314-26 BMW100314-27

Removed headlight brackets. Bolt at RH outboard serves as ground point, had been replaced by oversize screw and wing nut.

Lamp adjustment uses two hand turned nuts with long plastic handles and one spring per bulb. Note that two adjusters are long and two are short, use long ones in outboard (deeper) bucket. Threaded rod has special plastic hook at end, fits into bucket.

BMW100314-28

Disassembling adjusters was extremely hard. Soaked with PB Blaster and let sit an hour, just able to break loose. I was worried the plastic would break.

BMW100314-31 BMW100314-32 BMW100314-33 BMW100314-34

BMW100314-35 BMW100314-36

Finished the day sanding down previous application of filler at RH rear. Several low spots remained, plus a small hole that requited fiberglass and POR-15 to fill.