Monday, April 27, 2009

Reinforced the RH tail light, Haleiwa Ride

Yesterday was the Haleiwa Metric Century ride, which I rode with my wife. So no work done on any of our cars. The previous Sunday I did work on the E9, I just never got around to writing about it.

When I welded the latest patch in place I thought I had a problem where the upper edges attached. The tabs were too small to weld. Since I was out of time I had to wait a week to test the welds.

First thing I did was to grind down the beads. Sure enough, neither end was convincingly secure, and some of the beads toward the left end of the bottom were not very solid. I decided to strengthen the sides with new material on the back side and redo the welds along the bottom.

BMW090419-01

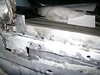
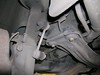
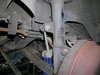
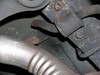
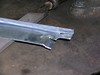
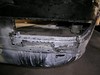
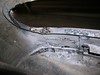
This is a view of the outside after grinding down the welds. On the left side the weakness is caused by a hole where the original metal was too thin. The tab just below that extends to the left turned out well, but too small to be relied on to carry the load. Above the hole what metal remains is very thin.

BMW090419-02

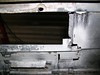
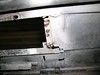
Same location viewed from inside the trunk. If the original flange were solid all the way done my design would have worked, but that notch where I cut out some rust weakened the joint.

BMW090419-03

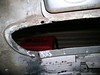
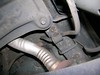
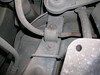
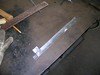
The problem with the outboard end was the joint, which lacked any overlap. Here I have already ground away the area, to prepare for welding.

BMW090419-04

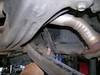
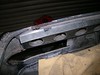
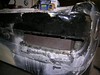
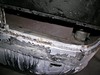
Another look at the entire tail light area, At this point I did the POR-15 wash and metal prep, and when that was dry I shot everything with Weld-Thru primer.

BMW090419-05

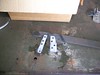
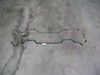
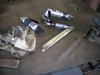
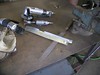
The two reinforcements, after metal prep treatment. The one on the left goes inboard. Note the Z-bend at one end.

BMW090419-06

View from outside after new welds.

BMW090419-07 BMW090419-08

Reinforcements welded in place.

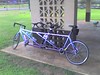
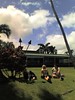
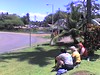
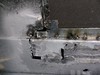
Like I said, yesterday was the Haliewa Century Ride. I managed to take a few photos with my old cell phone, not nearly as good as my Nikon, but nice just the same. The weather was perfect, the best Haleiwa Ride I can remember. Usually the wind is ferocious, and some years it rains throughout the day. Last year my wife shreadded a tire, and we stopped to help two more riders with mechanical problems, so it was a long day. This year my wife was riding on a broken toe so we only did half distance, and without any interruptions and despite a long stop at Ted's Bakery we arrived back in Haleiwa around 10:30! We had planned to eat lunch at Haleiwa Joe's, so we sat outside on the lawn to wait until they opened.

04-26-09_0847 04-26-09_0848 04-26-09_0849

04-26-09_0943

04-26-09_1112 04-26-09_1113

04-26-09_1143 04-26-09_1144

Sunday, April 12, 2009

Fixed the Camry sway bar

The headline says it all. My shop time was taken up replacing the rear sway bar on our 87 Toyota Camy station wagon.

Getting the old bar out was a snap. The only hard part was breaking loose the 14mm nuts on the links. My standard length open-end wrench could not generate sufficient torque. Fortunately the shop has a set of Snap-On extended length 12-point box wrenches, and one of those did the trick.

TOYOTA090412-01 TOYOTA090412-02 TOYOTA090412-03

The big challenge was installing the new bar. I suppose that removing things like the rear suspension mounting bracket and parts of the fuel tank would allow the bar to slip easily into position, but I was determined not to have a small job turn into a big one. After many attemts, starting from both sides, I ended up starting on the right. The key move was loosening the bolt that holds on the plastic fuel tank cover, on the right side. Pushing the bracket down gave just enough clearance to slip the end of the bar past the fuel tank mount.

TOYOTA090412-04 TOYOTA090412-05

My one mistake was starting with the bar on the wrong side of the brake line. After it was in I realized that there was no way to slip the off-set end past the brake line, so I had to disconnect the line. That meant bleeding the brakes at the end, but very little air snuck in during the few seconds the line was separated.

Sunday, April 5, 2009

Broken Camry, more E9 welding

The first order of business today was to discover the source of a thumpy sound coming the the rear suspension of our 1986 Toyota Camry station wagon. Turned out to be a broken anti-roll bar (a.k.a. sway bar).

TOYOTA090405-01 TOYOTA090405-02 TOYOTA090405-03

Last week I decided to fill a gap between the lower tail light patch and the existing sheet metal with a little doubler. It worked great, but it interfered with the fit of the upper half of the patch. Work on the E9 today began with cutting a notch in the upper patch to clear the doubler.

BMW090405-04 BMW090405-05

Next came fitting the inboard end. I had two height changes to deal with, one going one way and one the other way. It took a few cuts and a little hammering, but it all worked out.

BMW090405-06 BMW090405-07 BMW090405-08

The last thing to do before welding was to cut away the top edge in order to create the 3 3/16 in. opening for the tail light. I left some material at what will be the lower left corner of the opening to create a nicely radiused corner.

BMW090405-09 BMW090405-10 BMW090405-11

For some reason the welding did not go as well as it did last time. I was not getting good penetration. Next time I think I'll try warming up on some scrap first.