Sunday, December 28, 2008

First Attack on Spare Tire Well

My plan for today was to repair the rust holes in the spare tire well using fiberglass impregnated with POR-15. This needed to be done before treating the exterior of the well, which needs to be done before welding on the patch I have been working on. This is a case of dependencies; happily I realized this before getting hopelessly ahead of myself.

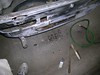
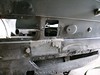
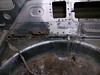
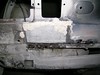
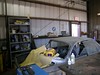
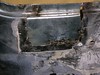
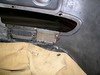
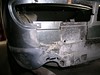
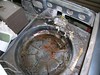
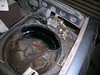
At the outset I thought I would do the entire inside of the well. All I had to do was scrub off the loose, rusty bits with a wire brush. It turns out that this area is treated with a hearty layer of black tar, which made progress slow. To scale the task to the available time I focused my efforts on the back half, and ended up doing a bit less. Still it was enough to allow me to move forward on the rear panel repair.

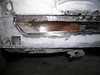
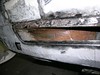
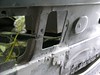
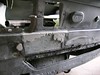
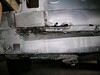
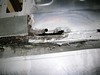
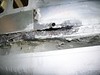
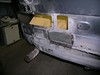
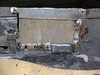
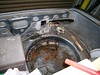
I did not bother with a before picture because there are plenty of those in previous postings. Actually, a before picture would not have revealed the extent of the damage due to the way the still tenacious rubbery undercoating covered the holes. I would say that most of the rust damage in this area was from the inside. I wonder why the black, tar-like primer failed to block moisture. It was not until I wire-brushed the outside that the holes became clearly visible.

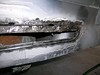
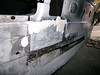
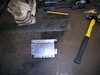
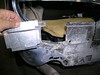
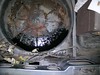
The first set of pictures were taken after wiping the area with acetone to clean off any tar spread by the wire brush, followed by the usual Marine-Clean and Metal-Ready treatment. The orange stuff is primer. Since it is stuck in pitted areas I suspect it was part of a rust treatment -- these areas would have left the factory smooth. Maybe that black tar primer was another after-market treatment. The black layer is most apparent along the border between bare metal and finish painted surface and is on top of the orange primer.

BMW122808-01 BMW122808-02

BMW122808-03 BMW122808-04

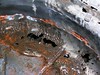
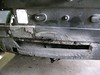
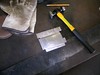
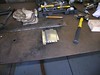
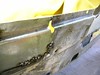
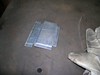
Due to the compound curves I cut the fiberglass on the bias. Here it is worked into place over bare metal.

BMW122808-05 BMW122808-06

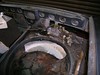
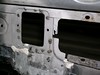
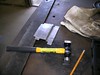
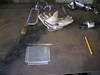
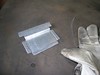
Here is how it looked after applying POR-15. Actually I used my tube of POR PATCH, which is basically POR-15 in a tube. I spread it with a small foam rubber brush.

BMW122808-07 BMW122808-08 BMW122808-09

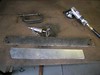
I was worried about attempting this today because it was raining hard on my way to the shop. Luckily by the time I was ready to apply the paint the rain had stopped and the air was considerably drier.

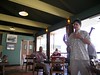
For dinner my family met with our old friend Lester Mau. It is not very often that the four of us sit down for dinner together, and to go out with a friend is almost unheard of these days. We ate at Good to Grill, next to the new Safeway in Kapahulu. Not bad. Obviously the price of the meal goes mostly to ingredients, but what little service we got was pleasant.

Dinner122808-01 Dinner122808-02

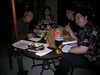
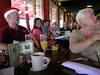
Last but not least, it is time once again for the annual Dunn family Christmas photo. Yes, it is wacky, a tradition in itself.

Xmas 2008

Ah yeah, one more thing. On Saturday we attended the annual mochi pounding party given by a friend of a friend, in Kapahulu. I took a lot of pictures and have not had time to sort through them, but I did put together a little video. You can watch it on YouTube.

Sunday, December 21, 2008

More Lotus Than E9 Today

Today was the annual British Car Club Christmas party. It was at the Kona Brewing Co. Restaurant at the Hawaii Kai Shopping Center. For the first time in weeks the weather was beautiful, so there was much grumbling about how we should have been out driving around the island. As unpredictable as the weather has been it could only be considered a fluke. Even yesterday, as I washed and shined up my Lotus I thought I might be wasting my time. I was dodging rain drizzle the entire time, and when I woke up this morning I was totally shocked to see nothing but blue sky and sunshine. To put all this in perspective I was watching football as I ate breakfast and it was snowing so hard you could barely see the crowd in the stands. "Lucky you live Hawaii," we like to say.

I always have trouble getting the Lotus started after it has sat awhile. Yesterday I decided to try an experiment and possibly save the battery at the same time. Without even trying to start it using its own battery I jumpered it with my trusty old Toyota Camry, clipping the positive lead to the connector right where it clamps to the wire. Sure enough, it cranked just fine. It didn't want to start, which meant lots of cranking and waiting, but eventually it coughed and sputtered to life. Water in the carb floats, I suppose. This eliminates everything else, like replays, grounds, and the ignition switch. The battery was new and is still good. The problem seems to be the cheap, after-market terminal I used when I switched back from aircraft type connectors to standard battery terminals. Yes, I actually used to use a 12 volt airplane battery, very light and spill-proof. Also very expensive. I really need to make a new cable.

Once I had the engine running I discovered another problem. The clutch was frozen. Luckily both my sons were home, so I had them rock the car while I sat inside with the trans in forth and the clutch in. After that it was fine, so I drove around the neighborhood for an hour to see if anything would fall off. Hey, its a Lotus.

This morning the car started just fine, and I made it to the meeting without a hitch. I never have time to attend the Saturday tech sessions. In fact, the only activity I've done so far with the group is the annual British Car Day at Kapiolani Park, so it was nice to hang out in a more social setting.

BCCH122108-01 BCCH122108-02

BCCH122108-03 BCCH122108-04

After the meeting there was still enough time to get some work done on the E9. I actually made it to the shop by 1:30. I started out improving the fit of the patch I cut out last week, but then I realized that the opening I had cut gave me unique access to a tight spot where the spare tire well, in the floor of the trunk, meets the rear panel. The area was covered with a thick, rubbery coating, but the area where I was had broken down, perhaps as a result of previous read-end collision damage, and light surface rust was spreading. I changed course and set to work scrapping off the loose, dry, cracked coating, finishing with the usual POR-15 prep treatment of a wash with Marine-Clean followed by an application of Metal-Ready. I took a picture of all the crud I scrapped off, and that doest include the stuff that ended up stuck in my hair or went flying off into unknown nooks and crannies. I'm not going to strip off all the undercoating. Some of it still looks good, even after 30+ years. When the exterior body work is mostly done I'll put the car up on a lift and look for more bad spots. At least for now I can get to one a lot easier before I weld on this latest patch, and POR-15 will be the perfect treatment for these areas. Maybe I should experiment with getting a heavy undercoating to stick to POR-15.

BMW122108-01 BMW122108-02

BMW122108-03 BMW122108-04

On the way home I rendezvoused with Patrick Casey, who has been holding onto the fire system I purchased for the Lotus. In the box was a bottle, nozzles, tubing, and a mechanical pull trigger. I have yet to study the installation instructions, but when its in I should be able to pull the handle from inside the driver's compartment and set off the fire extinguisher in the engine bay. Lotus Europas are famous for bursting into flame due to the lousy original plastic fuel lines, but then I changed all that. Still even a small fire in a fiberglass car can cause major damage. The smart thing to do would be to install that and the battery cable at the same time.

Sunday, December 14, 2008

Marathon Sunday

Today was Honolulu Marathon. Once again my wife and I got up at 2:30 A.M. to help. We are members of the clock team. Our job is to start all of the clocks along the route. I manned the one mile clock, partnered with a newbie named Nick, and my wife had the two kilometer clock. About a dozen team members meet at Fort DeRussey in Waikiki at 3:30 for a final time check and last minute instructions, then we all ride our bikes to our station and wait for the 5:00 start. My wife and I ride all the way from home, and after watching the first few hundred runners go by head off in search of breakfast. Well, today it rained. Hard. By the time we got to Big City Diner in Kaimuki we were soaked to the bone, so we road on home, got cleaned up, and went back. After a leisurely breakfast we went home, and on the way we could still see runners headed out. The magnitude of these events never fails to amaze me.

A lack of sleep was not the only thing that interfered with working on the E9 today. Since Friday I have been struggling with a bout of vertigo. On Saturday I doubted I could ride a bike Sunday, but with the help of Dramamine I managed. I had Nick go up the ladder to start the clock, while I called out the time. The two things that trigger a dizzy spell are looking up and, even more so, looking down. Needless to say, working on the E9 was a challenge.

The first thing to do was to smooth out the putty I applied at the end of last week's session. I started with my pneumatic grinder, then switched to a sanding block. The tricky part was to sculpt the indentation where the panel changes height. I ended up with one low spot. After the next patch is welded in place I can add enough filler to even out the surface. I think I have reached the point where I need to sand down more of the rear end, so see why there is so much bondo.

When I got the sculpting as far as I wanted to take it I still had enough time to cut out the next patch. Next week will begin with grinding it down to fit, and preparing the opening.

BMW121408-01 BMW121408-02 BMW121408-03

BMW121408-04 BMW121408-05 BMW121408-06

Tuesday, December 9, 2008

First Time Using Fiberglass

When I discovered POR-15 I read about a particularly interesting application, patching holes with fiberglass cloth. Apparently POR-15 works like polyurethane resin. Sunday was my chance to try it out.

The area I selected was where the rear panel has a height change. The rust hole -- more like a slot -- is where the panel curves in and under, just above the joint with the trunk floor. I decided to put the glass cloth on the inside, and later-on fill in the low spot with epoxy filler.

The first order of business was to strip off the primer I had used in the area, as well as a bit more of the ridiculously thick layer of bondo that I find all over the rear-end. For that I used a small die grinder and a beefy looking wire brush I picked up at Redline. Unlike other wire brushes, this one seems indestructible. Next came the standard POR-15 prep, a wash and an application of rust converter. One thing I did not do but probably should have was to rough up the bare metal with my grinder or some #80 sandpaper, to give the patch something to hold on to.

BMW120708-01 BMW120708-02
BMW120708-03 BMW120708-04

I already had a tube of POR PATCH, the type of POR-15 that comes in a tube, and because it seems a little thicker I decided to use that. The first bit that came out was runny so I put the cap back on and kneaded the tube a bit ... not easy with a metal tube. I used a wood tongue depressor to spread the POR PATCH and work it into the cloth. The rounded end was perfect for the curve in the metal.

BMW120708-05 BMW120708-06

When that was done I still had a little time left so I applied some Epoxy Putty to some of last week's patch. I stayed away from the lower areas because I anticipate welding there. I was especially interested in the lower right corner of the tail light opening. I finally used the last of the first box I purchased to use on the rear windowsill.

BMW120708-07 BMW120708-08 BMW120708-09

Sunday, November 30, 2008

Another patch welded on

This week picked up where last week left off. But first, I promised to take a picture of my E9 clock, and here it is. They are; I took two.
BMW113008-01BMW113008-02

Last week I made the Z-bend for the taillight flange. Today began with trying to hammer a little curvature into the patch, to match the curvature of the body. It does not need to be perfect because it will be finished with POR-15 Epoxy, like the window sill, but a little shape will minimize the thickness. In the process I decided that the only way to cope with the extra thickness along the right edge, caused by a previous repair, was to cut away the upper portion of the flange. That side would have to rely on an upper and lower tab for strength. The upper tab ended up rather small, and I might add some strength there in the future.

I don't think it shows up in the photos but I used a shrinking hammer on the narrow section of the Z-bend, and used the flat - curved face hammer in the picture on the larger faces, hammering into a shot bag. Worked rather well.
BMW113008-03BMW113008-04

After a thorough scrub with acetone I punched some holes along the flanges to weld through. The places without holes are blocked on the inside. Notice how narrow the top edge became after trimming to fit the taillight opening. That goes back to the Z-bend not ending up exactly where I intended. Oh well, practice makes perfect.
BMW113008-05BMW113008-06

For welding I tried a slightly lower voltage and I held the tip closer to the bead. The welds I did today came out a little better than the last couple of times, except where I welded on the outside. Maybe I needed more light.

Outside (new patch to your left)
BMW113008-07BMW113008-08 BMW113008-09

Inside (new patch to your right)
BMW113008-10BMW113008-11

In this last photo I tried to show where the extra layer of sheet metal interfered with the flange I started out with. The original metal can be seen just above the new welds on the inside of what appears to be a previous repair to the same area. My new patch is on the left.
BMW113008-12

Sunday, November 23, 2008

New Rear End Patch

I need to come up with a better way of describing these patches. How many more "new" patches will I make before the job is done? Maybe I should number them.

This one is directly under the left tail light. Actually it is where the bumper attaches. There appears to be some previous repair work in this area, old enough to find lead filler.

Today I fabricated the patch. For this one I decided to use the flanger. The left, right, and bottom edges will get a small flange from my pneumatic flanging tool. The top needs a deeper flange for the bottom edge of the tail light. Next time I will try to curve it a bit, but even so I anticipate bringing the surface up to hight with filler.

I made the first right-angle bend for the top in the vise. I did not align the hardwood form just right, so the bend ended up a little higher than I wanted. I think there is enough along the bottom edge to compensate.

The send right-hand bend was tricky. I ended up champing the piece to the steel workbench and bending in over the thick steel plate you can see in the background. Came out pretty good. What I need is a break ...

BMW112308-01

BMW112308-02 BMW112308-03

BMW112308-04BMW112308-05