Monday, January 26, 2009

Welded at Last

Before we get to the E9 I want to share a funny story. On my ride to work last week I came across a sad yet funny situation. Seeing a rode sign flattened is not so special. What makes it ironically funny is what the sign says, and what was secured to the sign pole.

Cycling012109

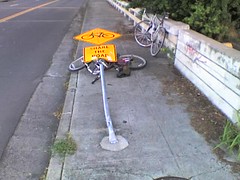
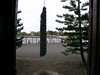
That's my beautiful Merlin leaning against the bridge. While I was taking this picture I was all decked out in cycling gear, and three people stopped to ask if I was OK. Just goes to show you that most Honolulu drivers are good folk.

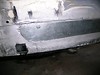
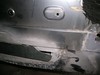
My goal for Sunday was to get the rear panel patch welded on. I have been working on this for way too long! And I made it, too.

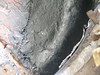
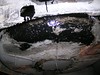
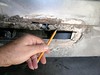
Last week I determined that the rust hole I wanted to use for the first bolt was too low, so I began by grinding it larger. That required me to use a washer to prevent the nut from pulling through, and even then bolting it in place was tricky. I marked the places where I wanted to drill for bolts and used a center punch to make drilling in the right place easier. With the patch held firmly in place by the first bolt I drilled through both layers with a 1/8" bit, then through the patch with a 9/32" bit. The bolts have 1/4" shanks but I wanted a little slop. With the patch removed I finished drilling through the original panel. The last step was to use my pnumatic punch to punch spot-weld holes al around the edge.

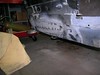
Due to Hawaii's demanding weather I hate to put things together without moisture protection, so before proceding I wanted to paint the patch with weld-thru primer. Especially the inside. First I cleaned it with POR-15 Marine Clean and roughened the surface with clean 180# sandpaper, to give the primer something to hold on to.

BMW012509-01 BMW012509-02 BMW012509-03

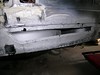
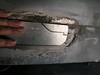
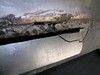
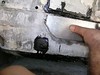
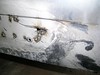
When the primer was dry I bolted the patch into place one last time. A couple of spots at each end needed help to lay flat, so I used some Vise-Grips to hold the edges tightly in place. This patch is different than the previous patches because the holes for welding are on the outside. This will require a lot of grinding, and some filler. After the patch was tacked in place I removed the clamps and bolts, then went back and finished the places that had been covered. I thought I would weld up the bolt holes until I realized that the welds would go right through to the inside, which would make more of a mess than the strength they would provide. I will use either epoxy putty or fiberglass and POR-15; probably the putty.

BMW012509-04

BMW012509-05 BMW012509-06 BMW012509-07

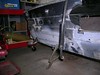
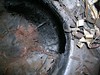
As I was setting up to weld my friend Tom offered to help me pick out some better tires from the junk tire pile and mount them, so that the car would not look quite so destitute. So next Sunday will be Super Bowl Sunday for most folks, and Tire Sunday for me. Who cares about the Steelers and the Cardinals, anyway?

Thursday, January 22, 2009

Nowhere to Clamp

Ever tried climbing a cliff, or a tree, and reaching a point where you had nothing above you to hold on to? That's how I felt looking at my current patch. In order to get a good weld the two layers must be held tightly together. The panel has a slight curve, so the long, flat patch wants to pull away. The usual solution is a few Vise-Grips, but the position of this patch makes clamping with those impossible. Some really big Jorgensen clamps might work, if they don't get set on fire by the welder. Maybe the Adjustable Clamp Company has what I need, but Chicago is a long way from Honolulu.

The solution I chose was one I had used before, bolts to hold the patch in place which are removed after the patch is tacked in place. In this case the holes need to line up just right, so I want to drill through both layers at the same time. Only I can't clamp the patch in place to drill the holes.

The solution to this problem came in the form of an irregularly shaped rust hole, right where a bolt belonged. This would allow me to slide the patch around and clamp it place, then drill the other holes exactly where I want them.

As I fiddled with the bolt thing I discovered a few places where the edge needed to be ground some more. Funny how long that takes.

BMW011809-01 BMW011809-02

It was at that point that I had to leave because my masseuse -- her name is Sonya -- was having a birthday party on the beach at Waikiki. Next Sunday I ought to have the patch welded in place. I feel like I am getting stuck too long on this one.

Sunday, January 11, 2009

Back to the Rear End

Last week I never got around to posting because I was busy finishing up the photos I took during our annual New Year's celebration. Our activities are typical for Hawaii, a mix of American and Japanese customs including a seemingly endless stream of parties with family and friends. It's all on my Flickr account in a collection named New Year 2009.

What I did last week was review the patch design that I have been working on, apply a second coat of POR-15 to the fiberglass, and apply POR-15 to the outside areas concentrating on the places that the hole I am trying to cover provides access to. When I applied the glass I decided to use my tube of POR Patch because it really is POR-15 in a tube and I was worried it might dry up. This time I was going to be covering a lot more area so I opened my can. Surprise! It had set up solid. But wait. When I shook it I felt sloshing. Sure enough, after a bit of work with a screw driver and hammer I broke through the rock-hard skin and found plenty of liquid underneath. When I was done I re-sealed the can with plastic wrap, but I really should buy a new, smaller can the next time I paint.

BMW010409-01 BMW010409-02

BMW010409-03 BMW010409-04

Today began with grinding away the drips and runs from where the patch will go and cleaning the entire opening down to bare metal with my trusty wire brush in the die grinder. I really did plan on welding today. I guess I underestimated how much I had to grind the bottom edge to get the fit right, because that ended up consuming most of my time today. Grind and fit, grind and fit. I found myself wishing the car was on a lift, but this way I get more exercise.

When the perimeter was finally the shape I wanted, I realized it wasn't. All along the top edge is where the trunk floor is welded to the rear panel. The hole I am repairing was caused my moisture collecting in the area, exacerbated by previous collision damage which must have compromised the paint. Over at the top right corner a significant piece of the original rear panel extends down and is securely attached to to the floor piece. This sheet metal is at the same height as the patch I am making. If I left it the way it was the patch would stick out noticeably. Even though this area is obscured by the bumper, the lump would be as obvious as a day one pimple. I could grind away the old metal, but that would weaken the joint. I decided to cut away that corner of the new patch. I know this will make the joint messy, but that is easy to fix with Epoxy Putty. I ended up drawing the cut lines but not cutting, in case I get a better idea during the week.

BMW011109-01 BMW011109-02

BMW011109-03 BMW011109-04

Before leaving I shot the opening with Weld-Thru primer. I just don't like leaving metal bare in Hawaii, even for a week.