Saturday, July 28, 2007

Grinding away

Last Sunday I tried out my new grinder. I had been using a wire brush on a die grinder to remove the loose rust and bondo. First I tried a non-metalic wheel. A welding book recommended this to avoid contamination of the steel with the metal from a wire brush. It worked fine on paint, bondo, and smooth steel, but as soon as I got into a big rust spot the brisles flew off. I tried a metal wire wheel, but after an hour it was half gone.

Previously I wrote about people giving me advice. On this subject the opinions were split. I should be using a grinder, and a grinder would be too slow. After shredding two wheels in as many hours and with very little to show for it, I went to Larsen's Tool Repair and purchased a Chicago Pneumatic CP-854 4 in. pnumatic grinder along with a couple of Makita 24 grit wheels. The nice lady at Larsen's even threw in a free bottle a Marvel air tool oil and a pair of safety glasses. I also picked up a CP-870 6 in. orbital sander, but due to a bout of brain freeze I failed to buy sanding disks. I finally picked up a pack of 3M 80 grit discs from Redline Automotive, but not before Sunday.

BMW072207CPtools 
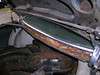
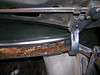
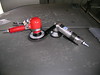
Sander on the left, grinder on the right.

The grinder works really well. The small size is easy to hold and move. The small diameter wheel used on-edge was able to sneak down into all but one low spot. The rate of removale was slow, but this gave me confidence that I was not at risk of turning good steel into Swiss Cheese. I did have some trouble removing the last of the paint. I felt as though going for 100% paint removable was resulting in too much metal loss. I think the sander will be better for this last bit.

BMW072207NoseAfterGrinding1 
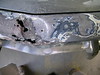
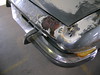
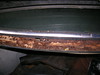
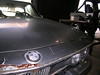
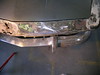
Nose after grinding. Green color casued by quartz halogen work light ... next time I'll leave it off.

BMW072207NoseAfterGrinding2 
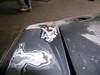
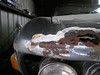
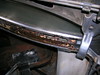
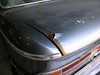
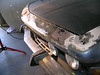
Same place from the side. The remaining bits of paint are too small to show up.

Monday, July 23, 2007

Rust treatment products from Auto Tech

I picked up a pair of products for treating rust and bare steel that have worked well for me. They are both made by Auto Tech and are designed to work together. The first is a degreaser, and the second is a converter.

The degreaser is called 1001 MPC. It is water-based and highly concentrated, so much so that if I do not wear rubber gloves my hands feel dried out afterward. It is a good all-around degreaser and can be diluted to match the job. For rust work the issue is to get down to clean steel. No oils, greases, waxes, or similar residue which could disrupt adhesion of new paint. The thing to do is to wash the area to be worked on prior to sanding, grinding, etc. to prevent contamination of the underlying layers.

The second product is called Rust-Prep. It goes on straight, so I purchased a gallon of it. It is a thin, watery liquid, which I apply with a brush. Rust-Prep does two things. It reacts with any existing rust to block further oxidation, and it leaves a thin zinc coating which also protects clean, bare steel. This coating is not very sturdy and is really intended to stand-in for paint until such time as the piece being worked on is ready for paint. The manufacturer recommends painting with a primer/sealer within 24 hours, but I have left pieces sitting indoors in the shop for a week that look fine. I just hate to paint one Sunday and grind it off the next.

I got my Auto Tech products at Pac Pro, 523 Mokauea St. in Kalihi. They have a lot of other lines as well, so stop by and check them out.

BMW072207Rust-Prep Here is pic of the nose area around the badge location. The rusty area on the left cuts through the badge area at an angle. To the right is a silver area. That is bare metal treated with Rust-Prep. There is still some of the blue paint, bondo, and promer here and there.

Everyone has an opinion

My E9 coupe always got a lot of attention when I drove it. Old men would smile and scratch their bald heads. Young women would smile and toss their long hair. All this attention was welcome, but some more than others. Even now, rust heap that it has become, the car gets a lot of attention in the shop. Every time I work on it people stop to ask what it is and why I am bothering. I'm sure some people think I'm crazy. Art Wegweiser on the BMW CS Registry list wrote, "to deal with what you have described and illustrated takes admirable cojones - or what ever the word is in Hawaiian. Big coconuts?" I explained about olo-olos.

One guy insisted my rusty patches were caused by Chinese steel. He insisted that while German steel was of the highest quality, BMW stamped their parts from blended steel. The rust breakouts were the Chinese parts. I'm thinking maybe he lost a dog to some bad food.

Most of the guys who stop to talk these days have an opinion on the best way to proceed, and they always tell me what they think. Basically it comes down to two choices, cut out and patch, or splice in large "clips." If I could get my hands on a car good enough for all the clips I'll need I'd probably end up driving it. Sure there are E9 clips available. Scarce, and if eBay item 280133219809 is any example they aren't much better than what I have. As for new, replacement pieces, the cost is high for what I am trying to do. A nose from CSI goes for $924, and that does not include shipping to Honolulu.

If my objective were to have a nice E9 I am certain I would approach this in a different way. I would be much more likely to crush my car and invest what the scrap dealer gives me in a car like eBay item 260141237306, a nicely tricked out 73 E9 which after twenty-three bids and with four days to go has a high bid over $18k and the reserve has not been met. Now that's a car to make people smile! But my course of action is to start with a rusty car I have already driven and enjoyed, one with little if any residual value, and through the process of restoring it learn the proper way to repair rusty steel. I really do want to cut and bend and hammer out a new nose for my car. Much too costly for a shop to do, but it's my hobby.

Monday, July 16, 2007

The World's Ugliest Something

I noticed that the pics I posted were all close-ups, and someone who does not already know what an E9 looks like won't have a clue what I am writing about. So, here's a few shots of my car as it looks today, sitting in its workshop bay.


BMW071507wholecar1 BMW071507wholecar2 BMW071507frontlow

Looks to me like a contender for the World's Ugliest Something contest. Trust me, it is a beautiful car. How good would you look in the hospital, during surgery?

This week's goal was to rip into more rusty places in order to eventually make an honest assessment of the car's condition. The good news is that the typical structural problems with the rocker panels have been taken care of, so the frame is sound. What I have is more like a really advanced case of acne.

For reasons I cannot fathom, the PO applied a mountain of bondo (I use the term generically) along the upper sides of the front fenders and the nose. As if the hood was sitting too high and he did not want to adjust it lower. I discovered this as I removed loose rust and worked out to solid metal. Then I decided that the cracks in the finish without rust might only go down part way, so I did some exploratory "digs." The next set of pics attempt to show this.

Notice the layers. Her is what I can make out:
  • thin gray primer (lowest)
  • light gray filler
  • original color
  • brown filler
  • current color (top)
The significant thing is the thickness of the brown filler. In the nose where the badge was, the indentation was molded into a layer at least 1/8in. thick. It completely covered the original indentation in the sheet metal.


BMW071507frontLHdeepbondo1 BMW071507frontLHdeepbondo2 BMW071507frontLHdeepbondo3

BMW071507frontRHdeepbondo1 BMW071507frontRHdeepbondo2

More in back

I sort of got started removing the brightwork along the left side. I discovered that in some places it was held on with "V" shaped spring clips while in other places special screws and nuts. I gave up for the day when I discovered I would have to remove the interior next to the back seat ... a good place to start next time.

As I worked on the trim my eyes settled on the area below the rear window. Large, deep cracks had formed, suggesting a deep bondo zone. Using a putty knife I had no problem loosening the bondo and exposing a rich deposit of ferric oxide beneith the surface. I cleaned it up a little with a wire wheel, and decided to save what little remains as a guide to making a replacement, so I wet it all down with rust converter.

In the first pic in this series you can see where I saved a long piece of the magnificient bondo sculpture the PO created below the rear window. He must have attended art school. The last pic in this series shows the same area as the third after wire brushing and treatment. I think some of those white spots are paint! What would cause a few spots to hold out while all around them the battle is lost?

BMW071507rearwindowdeepbondo1 BMW071507rearwindowdeepbondo2 BMW071507rearwindowdeepbondo3

BMW071507rearwindowdeepbondo4

Thursday, July 12, 2007

Mike and Pattie at Apple Store opening

Actually I'm just learning how to get photos from my cell phone to this blog. That's my wife and younger son taken at Kahala Mall at the grand opening of the Apple Store. Yes, he is tall. My Nikon takes much sharper pictures, but I always have my phone with me.

Fresh Metal

Yesterday I bought sheet metal to use for rust repairs. I measured the thickness of panels on the car, at several locations, and it seems as if BMW used 18ga. in the front and 20ga in the back. That's odd. I decided to buy just the thicker 18ga. Found a nice table of Sheet Metal Thickness Gauges at the University of North Carolina at Chapel Hill.

In recent weeks I've been running all over town looking for sources for welding equipment and supplies. The equipment was hard enough to find, but supplies ... I was expecting a store filled with sheets and rods and pipes in various grades of steel and aluminum, but as yet have not found such a place.

I bought my sheet from Universal Manufacturers. They are located in Kalihi, on Kalani Street. These are the folks who fabricated some parts for my Lotus Europa, especially the gas tanks. They told me they only bring in thin sheet steel galvanized because the plain stuff rusts too fast. My 2ft. x 4ft. 18ga. galvanized steel sheet cost me $35.00. Seems like a lot, but they did write my name on it. Besides, the cost of the sheet metal will be nothing compared to the time it will take to get it right.

I'll be writing more about welding, but for now let me say that in Honolulu the best place I have found for welding equipment is GasPro. They carry Miller.

Wednesday, July 11, 2007

Back Story

I bought my BMW E9 coupe around 1994, to replace a 114 (2002) I had been driving for a few years. That car had been an impulse buy, a cheap, run-down, just-for-fun "beach car." My wife had the nice soccer mom car, a two door Jeep Cherokee, so all I wanted was something cheap and fun, but with room for kids and groceries and stuff.

The 2002 was slowly rusting away, and one day the gearbox packed up, and that was that. Off to the junkyard. Thing is, I missed it so much I wanted another, only this time I planned on spending more and getting a respectable car. One day I spotted something odd for sale in the newspaper. A BMW, right year, strange model ... what the heck is a 3.0 CS?

The car was beautiful. Just painted, running smooth and strong. Not cheap, but not bad, about what I was planning on spending but for a whole lot more car. I threw a fist full of cash at the seller and drove away as happy as can be. Even though it was a 73 it looked and ran like a new car.

I have no regrets about that decision. I drove the car as is for at least four years. All I did was wash it, change the oil, and soak up the compliments. Well worth the money. It's the kind of car that causes otherwise calm, everyday people to shout "What is that?" out the window of their Camry while speeding down the freeway.

Then, problems. Mostly electrical. First the fuel pump would mysteriously stop, then start up again. Then the electric windows would sometimes refuse to work, as if haunted.

Tired of driving around Honolulu in the summertime with the windows rolled up, I used this excuse to start riding my bicycle to work. Every now and then I would go start it up and tinker under the dash, but mostly the car just sat out and started to rust. Oh, and I still ride my bike to work.

Eventually I found a place where I could work on the car. Another E9 fan, Mike Pelly, was nice enough to look over this mess and pointed out some useful details. First, and very important, the rust is confined to non-structural areas. The rocker panels have already been repaired, professionally, and look solid. Second, this is a Euro spec car, probably imported directly to Honolulu. Apparently this gives it more panache.

For many months since then the E9 has been on hold while I worked on my Lotus Europa. The problem there was a parts back order that took five months to fill. Happily the Europa is back on the road and the E9 is getting my full attention.

Here are some photos I took last December. Soon I'll post some pics of the exploritory phase, in which I discover that the PO was the King of Bondo.

(click to enlarge)

BMW1106frontright Nose badge and RH front.


BMW1106frontleft LH front. Cracks due to thick coat of bondo, steel underneath is solid.


BMW1106lefttrunk Rust through on trunk.


BMW1106rightApillar RH A pillar.


BMW1106backright RH tail light.

Monday, July 9, 2007

First Post!

Wait. This isn't slashdot. No FP bragging rights here.

Now that I have created this blog I need to fine tune it, then fill in the back story about the subject, a BMW that I am trying to save.

Another topic that will come up from time to time is my strange tasts in computer hardware and software. I am posting this from a PC running FreeBSD and the Gnome desktop. If you know what that means you probably don't have much interest in my BMW E9.