Saturday, October 29, 2011

RH nose, air dam, almost ready

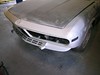
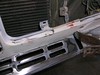
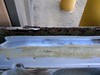
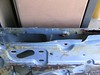
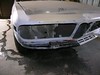
My goal for the day was to duplicate on the right side what I had done on the left, namely bring the repairs to a close and put down a coat of real paint to block moisture as I continue working elsewhere. This does not mean the area is finished and ready for paint. More like ready to start wet sanding as prep for paint.
BMW111029-01 BMW111029-02
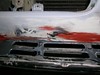
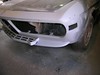
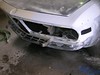
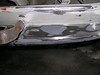
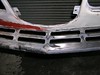
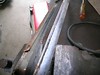
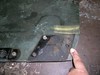
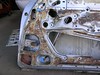
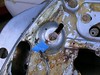
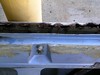
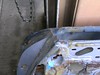
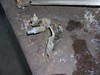
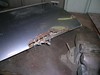
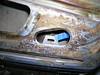
Well, I didn't get that far. There are some tricky spots remaining. Most notably a deep groove along the joint between the panel beneath the grill opening and the air dam, caused by a fiberglass patch. In the close-up pic it is below the black fiberglass patch in the center of the pic. I got as far as being ready to apply filler but was out of time. Hopefully I'll do that during the week.
posted from Bloggeroid

Saturday, October 15, 2011

LH door off, LH nose painted

Had a good day today. The kind of day where everything just works. Finished everything I planned to do with time to spare, so I had a relaxed lunch with my wife.

I bounced back and forth between painting the nose ... what I wanted to do last week ... and removing the LH door.

BMW111015-01 BMW111015-02 BMW111015-03 BMW111015-04 BMW111015-05

I used a #6 metric hex wrench on that special hinge bolt, and to get better grip I cleaned off the paint with a small, pointy wire brush in a die grinder. Came out easy.

On the RH side the door window motor ground wire on the inboard end was attached to the frame with a screw. On the LH side things were different. The original ground wire was extended with a sliced in section, then went to a multi-terminal ground point which was not connected to anything. Odd.

BMW111015-06 BMW111015-07 BMW111015-08

Wiped down the nose with acetone, applied two coates of acid etch primer, them two coats of white finish paint. This area is not finished, I just want to keep moisture out.

Next week I need to get the RH nose to the same level of completeness and disassemble the LH door.
posted from Bloggeroid

Sunday, October 9, 2011

Bad shoulder brings me back to nose

On Friday I had an acupuncture session on my shoulder to treat an old issue that was aggravated by the century ride. That meant I was resting, so no hard efforts or heavy lifting. I decided to put off working on the left door and instead returned to the nose.


After my Friday appointment I stopped by BMW of Honolulu to walk the lot and get a price quote on rubber bits for the doors. Saw a super clean used 3 series wagon, too new, too expensive, and a great looking new Mini Cooper Coupe. Not what I need. The quote came to $2,000. The expensive pieces are the door seals at $400 and change each side. Seems excessive, but what can you do? Still no word from the guys in England.


BMW111008-01 BMW111008-02 BMW111008-03 BMW111008-04 BMW111008-05 BMW111008-06 BMW111008-07

My goal for Saturday was to get a coat of etching primer and a coat of enamel on at least the LH side, including the bumper mount and the top side of the air dam. I would have made it were it not for the car in the bay next to mine -- late model, pure white -- and wind -- not blowing away from that bay. I plan on going back Wednesday long enough to shoot it. I did do the POR-15 wash anf prep drill.

BMW111008-08 BMW111008-09

Since I had a little time I decided to get started on the LH door by removing the outer window trim piece. It just lifts of, no screws. Between the rusty clips and the rusty sheetmetal underneath, it was a bit of a fight. Previously I left the RH piece alone, but my curiosity got the netter of me so I tried to remove the part with the fabric and fuzzy stuff that rubs against the glass. Turns out it bends really easily. That, and the lack of rust, suggests it is made of aluminum. I wonder where I can source that felt fabric?

I spent Sunday afternoon shopping for a car to replace my van. Stopped by Servo to look at a 328IS (I am really looking for a wagon) and the salesman turned out to be my old friend Eddie Higa. What a small town. Also checked out a private party 5 series wagon, turned out the mechanic is a cycling buddy. Might be the perfect car. I'll call him Monday.
posted from Bloggeroid

Saturday, October 1, 2011

Door deconstruction

Learned a lot about E9 doors today. Some things seem really well thought out, others seem haphazard. Obviously a side effect of being hand made. I also learned that one of this car's POs was a careless mechanic, because the guy I bought it from told me he swapped out the doors from some he bought on the mainland, and I found lots of missing hardware. Why use two bolts when one will do?

BMW111001-01

I decided to start with the vent window gearbox, but that was a mistake. Need to remove the entire window frame first, as it slides down into the gearbox drive shaft.

BMW111001-02 BMW111001-03 BMW111001-05 BMW111001-06 BMW111001-07 BMW111001-08

Removing the window only required two bolts, both in the rear. Appears a third bolt in the rear lift bracket was missing. The glass is passable, but not all that good. Has a long scratch along one edge (as if a rock got jammed in the window opening), and there is a chip near the upper edge. I am not going to replace it until everything else is nice. Which may be never.

BMW111001-09 BMW111001-10 BMW111001-11 BMW111001-20

The forward window rail carries all of the weight. Along with one or two normal looking bolts that go into tapped holes, there are two unusual mounts made up from slotted studs and nuts. Remove the nuts and washers, then "tighten" the studs if necessary until they slide up through the slots.

BMW111001-13 BMW111001-14 BMW111001-15 BMW111001-16 BMW111001-17

I took a series of five pictures of to detail the rust damage along the top edge. The inner panel will need some repairs before new skins can be attached. I plan to do that before removing the old skin.

BMW111001-18 BMW111001-19

The vent window connects to the gearbox via a flat tang and slotted shaft. Looks like a bolt belongs here, but nothing present.

BMW111001-21 BMW111001-22

Two quick shots of bottom edge rust damage. May need to repair inner panel but does not appear as severe as the top edge.

BMW111001-23 BMW111001-27

Removed the outer door handle and the lock.

BMW111001-24 BMW111001-25

The rear lift rail was only attached by two thin nuts at top of door. Note thin adjustment plate between nuts and door. Bottom end appears to be missing a bolt.

BMW111001-26

Removed all of the trim retaining nuts, but unable to remove trim strip because one stud was rusted to its washers. Shot with PB Blaster.

All in all a very satisfying day. Do need to get back to the nose, it needs a little more work and a coat of paint to stave off more rust.
posted from Bloggeroid