Tuesday, October 30, 2007
No Word From Mac Tools
Yesterday I looked for information on the shop's plasma torch. It's a Mac Tools item, so I figured it would be a re-branded Lincoln or something like that, but I could not match it Up to anything. I visited the Mac Tools web site but it is mostly unfinished. I wanted a detailed parts list, and a maintenance manual would be nice. These days it is common practice for manufacturers to put reference material on-line in support of pre-sale and post-sale service. Nothing like that at the Mac Tools Site. Eventually I found a mail address and I wrote to them. No reply yet, not even an automatic response.
Monday, October 29, 2007
I have a life
Lately my goals for the E9 remind me of those nightmares where you are trying to run somewhere but no matter how hard you run you don't get any closer. This weekend was a doozy, and even last weekend was busy, the result being that two Sundays ago I could only work on my Toyota's window regulators to keep the front windows going up and down, and this past Sunday I didn't get to the shop until two in the afternoon.
My late start was not because I was hung over or decided to go surfing instead, but because I bought my wife a "new" bike and Sunday was the only day we could pick it up. It's a used but still very clean Serotta Ledgend Ti, a beautiful companion to my Merlin Magia. Even used it cost more than a '65 Ford Falcon did new. All new Shimanu Dura-Ace drivetrain with a 12-27 cassette and a 50/34 compact crankset. The kind of bike that requires a fitting before you take it home. Needless to say she is much happier with her new bike than anything I am doing with the E9.
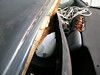
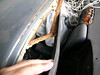
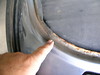
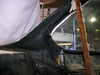
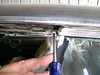
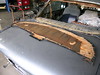
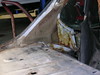
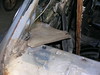
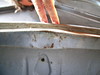
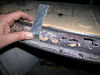
I was planning on using the area under the rear window to test using POR-15 to patch rust holes. When I looked at the damage with that in mind I realized that the damage was too extensive. Patching with POR-15 and fiberglass requires solid sheelmetal nearby, and the entire piece running along the forward edge of the trunk below the window in heavily rusted. I decided to put off playing with POR-15 and move right on into matal forming and welding.
Yesterday was supposed to be cut, bend, and hammer day. I figured that in one day I ought to be able to fabricate the necessary repair piece or at least end up with one bent wildly out of shape. My late start had me scale back my goal to just cutting and bending. I did not even get that far, because the shop's plasma torch was broken.
Minor rant: The problem with the plasma torch is typical of a shop like the one where I work on my car. The shop has lots of tools available, but sooner or later everything gets treated badly. If you want good stuff you can rely on, you really need to buy your own. Of course this does not apply to big things, like lifts and air compressors and impact wrenches. Hand tools for sure. The thing is, a plasma cutter is not just a hand tool. Even so, I was counting on using the shop's welding equipment, and already I see where I need to buy my own welder. Now perhaps I'll need my own cutter, too. This week I am going to research the one the shop has and help fix it.
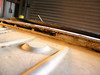
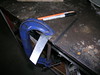
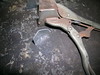
The upshot is that all I got done was bending a test strip. My piece of sheet metal is long enough, and the steel workbench I plan to bend it on (not having a brake) is plenty long enough. I even found a big hardened steel pin in the hell box I can grind down a little and use as a buck as I form the piece.
Next Sunday will be a very productive day. I just know it.


My late start was not because I was hung over or decided to go surfing instead, but because I bought my wife a "new" bike and Sunday was the only day we could pick it up. It's a used but still very clean Serotta Ledgend Ti, a beautiful companion to my Merlin Magia. Even used it cost more than a '65 Ford Falcon did new. All new Shimanu Dura-Ace drivetrain with a 12-27 cassette and a 50/34 compact crankset. The kind of bike that requires a fitting before you take it home. Needless to say she is much happier with her new bike than anything I am doing with the E9.
I was planning on using the area under the rear window to test using POR-15 to patch rust holes. When I looked at the damage with that in mind I realized that the damage was too extensive. Patching with POR-15 and fiberglass requires solid sheelmetal nearby, and the entire piece running along the forward edge of the trunk below the window in heavily rusted. I decided to put off playing with POR-15 and move right on into matal forming and welding.
Yesterday was supposed to be cut, bend, and hammer day. I figured that in one day I ought to be able to fabricate the necessary repair piece or at least end up with one bent wildly out of shape. My late start had me scale back my goal to just cutting and bending. I did not even get that far, because the shop's plasma torch was broken.
Minor rant: The problem with the plasma torch is typical of a shop like the one where I work on my car. The shop has lots of tools available, but sooner or later everything gets treated badly. If you want good stuff you can rely on, you really need to buy your own. Of course this does not apply to big things, like lifts and air compressors and impact wrenches. Hand tools for sure. The thing is, a plasma cutter is not just a hand tool. Even so, I was counting on using the shop's welding equipment, and already I see where I need to buy my own welder. Now perhaps I'll need my own cutter, too. This week I am going to research the one the shop has and help fix it.
The upshot is that all I got done was bending a test strip. My piece of sheet metal is long enough, and the steel workbench I plan to bend it on (not having a brake) is plenty long enough. I even found a big hardened steel pin in the hell box I can grind down a little and use as a buck as I form the piece.
Next Sunday will be a very productive day. I just know it.
Friday, October 12, 2007
POR-15 Starter Kit
Back when I was working on my Lotus I heard a lot of talk about rust prevention treatments. Since the Europa has a fiberglass body I was only interested in the steel frame. All of the discussion boiled down to four alternatives, 1) Powder coat, 2) Por-15, 3) Zinc-chromate primer topped with a modern two-part top coat, and 3) Rustolium. My goal was to get my old Lotus roadworthy and enjoy it, so speed and cost were important. Since the frame was in excellent condition I decided to go with Rustolium. It brushes on easily and I have the option of spray cans for smaller, more visible parts. Clean-up is easy using mineral spirits.
While researching rust repair for my E9 I again found POR-15 mentioned. The word-of-mouth was not always good. People complained about the cost, health risk, and limited shelf life after opening. Some said it dried to a soft, delicate film easily scratched and chipped. Some just did not like the way it looked.
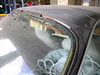
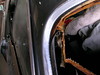
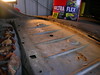
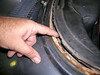
What really got me interested was some information on using the POR-15 family of products to repair rust damage. My E9 has a badly rusted area along the top edge of the trunk, leading Up to the rear window. It looks just like the examples I found surfing the POR-15 web site. Fabricating and welding in a new panel is far beyond my skill level, so I decided to give POR-15 a try.
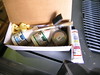
I just got back from my favorite auto paint supply store, Redline Automotive, who happen to be one of Honolulu's leading POR-15 dealers. I picked up a starter kit and a tube of putty. This Sunday I'll try it on the trunk and report on the experience.
While researching rust repair for my E9 I again found POR-15 mentioned. The word-of-mouth was not always good. People complained about the cost, health risk, and limited shelf life after opening. Some said it dried to a soft, delicate film easily scratched and chipped. Some just did not like the way it looked.
What really got me interested was some information on using the POR-15 family of products to repair rust damage. My E9 has a badly rusted area along the top edge of the trunk, leading Up to the rear window. It looks just like the examples I found surfing the POR-15 web site. Fabricating and welding in a new panel is far beyond my skill level, so I decided to give POR-15 a try.
I just got back from my favorite auto paint supply store, Redline Automotive, who happen to be one of Honolulu's leading POR-15 dealers. I picked up a starter kit and a tube of putty. This Sunday I'll try it on the trunk and report on the experience.
Monday, October 8, 2007
Digging under the dash
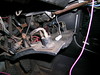
Soon after I bought this E9 I discovered that the electrical system had a few problems, and while pursuing those discovered the wiring under the dash was a mess. Somewhere along the way this car must have been fitted with a radar detector, a different radio, perhaps even a microwave oven. Non-original wire was hopelessly tangled up amongst the steering column, brake pedals, and original fuse block. The fuse block was not attached to anything, apparently because the bracket had rusted away.
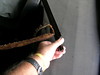
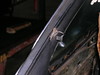
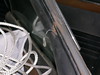
The first thing I did yesterday was to remove the windshield. Happily, the rust under the rubber seal was not as bad as I had feared. Nothing like in back.
I decided that to inspect and treat this area properly I had to remove the upper dash panel. It seemed straightforward, except that it was stuck in the inverted "U" shaped piece that shades the tach and speedo. According to my book, that piece is held in place by one upwards facing screw on each side. I think that part of my book is actually about the Bravaria, because on my car that hood is attached by a forward facing stud and an 8mm nut. At least on the left. After removing the nut the piece still would not come off, but the right side was blocked by the center console, radio, and air vent.
I decided it was time to dig into the dash. Finally I would confront that tangle of ugly wires.
The radio came out easily. It was not original. I think it was an 8-track, and I saw some snarled tape in the load slot. Into the rubbish it went. I saved the mounting tray and front panel, as those were original.
Next I discovered my door window switches are not all the same. From the top they appear identical. Underneith, the front pair look like the ones in the book, with push-on terminals, but the wiring is not original. Well done, but all of the wires are red vinal. The rear window switches plug into sockets. I discovered that after removing the switches I could push the sockets down and forward enough to reach the screws shown in the book. Except only the left side had a screw. One PO must have subscribed to the philosophy that where two fasteners were used, one should do, as I have found this in other places.
As it turned out I had to remove three more screws not metioned in the book, which go through a pair of braces that connect the sides of the console. I also had to remove the glove box switch. Underneith I found the original sockets for the front window switches, with red wires neated tapped on.
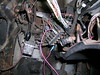
Even before I had the console out, as soon as I lifted the thin wooden plywood "bottom" under the radio, I ran into a pile of wood shavings. I thought a mouse must have taken up residence. It turns out the mess came from a dilapitated pressed-board bulkhead that was once attached to the front of the console and prevented objects placed on the wooden bottom from sliding off into never-never land.
Anoth piece I took off was the access panel under the steering wheel. It has three switches mounted on it. The two large round switches are push-on/push-off, and when on the button stickes out. The one on the left is green, and I am pretty sure it turns on the emergency flashers. The one on the right is yellow and seems to be for the front fog lights.
My car has an "extra" rectangular red light in back, just inside of the left tail light. I think it is the rear fog warning light described in the wiring diagram. According to the diagram this light has its own switch, and I think that is what the small round switch on the right side of the driver's access panel is for. It is marked "8" and pops out when a small tab at the base is pushed. It reminds me of an aircraft circuit breaker.
There are times when I am working on the car that I feel as though there is too much to do, and that I will never get it all done. I have heard other people say that a major renovation such as this poses a uique challenge in that it takes so long without giving anything back. We humans are motivated by success. In the middle of a project like this one, success is scarce and setbacks, like my broken windsheild, all to common. I find it helps to imagine my car all clean and beautiful again, and to pause and reflect on the good work accomplished each day.
 Time to remove upper dash
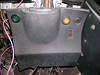 Panel under steering wheel contains three switches. Green is emergency flasher (?) yellow is fog light, small red switch might be rear fog light.
 Back side of steering wheel panel. Note odometer reset along left edge.
 Driver's side foot well. What a mess!
 Console out. Wood dust is from dilapidated pressed board at front of console (see wood screws) possibly a PO repair. Not serious.
The first thing I did yesterday was to remove the windshield. Happily, the rust under the rubber seal was not as bad as I had feared. Nothing like in back.
I decided that to inspect and treat this area properly I had to remove the upper dash panel. It seemed straightforward, except that it was stuck in the inverted "U" shaped piece that shades the tach and speedo. According to my book, that piece is held in place by one upwards facing screw on each side. I think that part of my book is actually about the Bravaria, because on my car that hood is attached by a forward facing stud and an 8mm nut. At least on the left. After removing the nut the piece still would not come off, but the right side was blocked by the center console, radio, and air vent.
I decided it was time to dig into the dash. Finally I would confront that tangle of ugly wires.
The radio came out easily. It was not original. I think it was an 8-track, and I saw some snarled tape in the load slot. Into the rubbish it went. I saved the mounting tray and front panel, as those were original.
Next I discovered my door window switches are not all the same. From the top they appear identical. Underneith, the front pair look like the ones in the book, with push-on terminals, but the wiring is not original. Well done, but all of the wires are red vinal. The rear window switches plug into sockets. I discovered that after removing the switches I could push the sockets down and forward enough to reach the screws shown in the book. Except only the left side had a screw. One PO must have subscribed to the philosophy that where two fasteners were used, one should do, as I have found this in other places.
As it turned out I had to remove three more screws not metioned in the book, which go through a pair of braces that connect the sides of the console. I also had to remove the glove box switch. Underneith I found the original sockets for the front window switches, with red wires neated tapped on.
Even before I had the console out, as soon as I lifted the thin wooden plywood "bottom" under the radio, I ran into a pile of wood shavings. I thought a mouse must have taken up residence. It turns out the mess came from a dilapitated pressed-board bulkhead that was once attached to the front of the console and prevented objects placed on the wooden bottom from sliding off into never-never land.
Anoth piece I took off was the access panel under the steering wheel. It has three switches mounted on it. The two large round switches are push-on/push-off, and when on the button stickes out. The one on the left is green, and I am pretty sure it turns on the emergency flashers. The one on the right is yellow and seems to be for the front fog lights.
My car has an "extra" rectangular red light in back, just inside of the left tail light. I think it is the rear fog warning light described in the wiring diagram. According to the diagram this light has its own switch, and I think that is what the small round switch on the right side of the driver's access panel is for. It is marked "8" and pops out when a small tab at the base is pushed. It reminds me of an aircraft circuit breaker.
There are times when I am working on the car that I feel as though there is too much to do, and that I will never get it all done. I have heard other people say that a major renovation such as this poses a uique challenge in that it takes so long without giving anything back. We humans are motivated by success. In the middle of a project like this one, success is scarce and setbacks, like my broken windsheild, all to common. I find it helps to imagine my car all clean and beautiful again, and to pause and reflect on the good work accomplished each day.
Time to remove upper dash Panel under steering wheel contains three switches. Green is emergency flasher (?) yellow is fog light, small red switch might be rear fog light. Back side of steering wheel panel. Note odometer reset along left edge. Driver's side foot well. What a mess! Console out. Wood dust is from dilapidated pressed board at front of console (see wood screws) possibly a PO repair. Not serious.
Hello from nBlog
This little post is to flag my first use of the nBlog program to post blog entries from my Newton Message Pad 2100. I hope to make this my primary blogging tool so that I don't have to wait to be home to post.
I have been fiddling around with nBlog for a while. Without documentation, the only way to learn how it works is to hack with it. In the process I discovered that it and the companion program XML-RPC (for the Newton) were written in the old school style. If the user does the right thing they work, but the slightest user error triggers long and indecipherable error messages. At first XML-RPC kept crashing, leaving my Newt's Internet connection stuck open. The only fix was a reset. Painful.
In a future post I will detail my configuration, so that all my fellow Newtoniers can post to their own blogs. So far my biggest issue is posting links to photos on flickr. Those URLs are unpredictable, so the only way to do it is copy and paste, and as far as I know my Newton cannot access flikr.
Subscribe to:
Comments (Atom)