Showing posts with label electrical. Show all posts

Saturday, October 15, 2011

LH door off, LH nose painted

Had a good day today. The kind of day where everything just works. Finished everything I planned to do with time to spare, so I had a relaxed lunch with my wife.

I bounced back and forth between painting the nose ... what I wanted to do last week ... and removing the LH door.

BMW111015-01 BMW111015-02 BMW111015-03 BMW111015-04 BMW111015-05

I used a #6 metric hex wrench on that special hinge bolt, and to get better grip I cleaned off the paint with a small, pointy wire brush in a die grinder. Came out easy.

On the RH side the door window motor ground wire on the inboard end was attached to the frame with a screw. On the LH side things were different. The original ground wire was extended with a sliced in section, then went to a multi-terminal ground point which was not connected to anything. Odd.

BMW111015-06 BMW111015-07 BMW111015-08

Wiped down the nose with acetone, applied two coates of acid etch primer, them two coats of white finish paint. This area is not finished, I just want to keep moisture out.

Next week I need to get the RH nose to the same level of completeness and disassemble the LH door.
posted from Bloggeroid

Saturday, February 12, 2011

E9 nose, Lotus ground

My plan was to get a batch of Technifill on top of the fiberglass put on the E9's nose last week, then work on the Lotus ground issue. Maybe even jump back and forth. It sort of went that way, but now there is so little time.

BMW110214-01 BMW110214-02 BMW110214-05

Trimmed the glass cloth and blended the edges with a sanding block. Roughed up the area with Scotch Brite pad. That's when I discovered my big can of Technifill is going bad. Last week I bought new activator, now I need the filler. Mixed up a batch with what I had and the new activator did its thing.

Lotus110214-03 Lotus110214-04

Switched to the Lotus. Jacked the rear, found the engine ground strap at the RH engine mount. Removed, wire brushed the connectors and the chassis connection points, reassembled. No improvement, starter only cranks enthusiastically with the booster grounded to the alternator mount.

The next link in the chain is the engine mount. I don't way to remove that, so I am considering adding a second ground connection directly to the bell housing.

At that point I was out of time. Bummer. I guess three hours is better than no hours.

posted from Bloggeroid

Saturday, February 5, 2011

Lotus lower links, part 1

On the way to the shop I stopped off at Redline Automotive for a new tube of POR Patch. The last one set up solid.

At the shop Tom showed me his latest find, an early Toyota Celica with an eight valve twin cam motor sold only in Japan. Hemi heads, twin Dellorto carbs, a lot in common with the Lotus twin cam. Not exactly running.

Lotus110205-01 Lotus110205-02 Lotus110205-03

Lotus110205-04 Lotus110205-05 Lotus110205-06

I started with the lower links I picked up last Monday from Patrick. One is almost straight, the other is bent back 0.25" at the shock mount tube. After pressing out a rubber bushing I straightened the link in the press. Ended up pretty straight, but the edges buckled in. With a bolt through the shock mount the inboard ends are a long way from parallel. I have another set on order, so I'll wait for those.

Lotus110205-07

Next I patched some small holes in the E9's nose with fiberglass cloth and POR Patch. Next week I can continue filling and shaping this area.

Lotus110205-08

I did work on one of the Lotus punch list items, curing the hard starting. My previous tests suggest a bad ground. I removed the bolt the battery ground cable attaches to and wire brushed the mating surfaces, but no improvement. The next thing to try is the ground strap at the bell housing.

posted from Bloggeroid

Sunday, June 6, 2010

Roundel mount patch

LotusStarter0207-01 LotusStarter0207-11

As I worked on getting the Lotus ready for last week's show I started a list of a the little things it needs. Turned out to be a pretty long list. I decided to try taking the Lotus to the shop on Sundays and knocking off a few at a time as I work on the E9, but before I do that I want to improve its starting. Currently it only cranks from the booster battery, and when the engine is hot even the booster has a hard time getting it going. Funny thing is, once it starts to crank it turns very fast. I already changed out the original starter with a Denso reduction gear model from Dave Bean (see photos). I brought home my toolbox today and plan on checking all of the grounds in the starting circuit. I don't think it's heat from the headers, because it also happens, to a lesser extent, from a cold start.

BMW100606-01 BMW100606-02

Today was just a continuation of the E9 nose job, which has progressed to the roundel mount. I hand formed one several months ago and since it turned out better than expected I decided to use it. To get started I had to measure everything very carefully and come up with a way to position the patch after the original is removed. In the process I discovered that the existing mount is offset to the right (to the left in the photos, which are upside down), about 1/8 in.

BMW100606-03 BMW100606-04 BMW100606-05

After getting the alignment worked out and a rough cut on the rear edge it was time to put some bend in the patch. This does not need to be perfect, just good enough to slip under the existing good metal. For this I held it in the vise and whacked it with a hammer on a hardwood block, moving 1/8 in. at a time, then a little smoothing witha convex faced hammer on a sand bag.

BMW100606-06 BMW100606-07

Finally the time had come to cut away the old roundel mount. A bit nerve racking, because I had to be able to position the replacement without it. With the rusty pieces removed I went in with tapered and straight file tips in the die grinder to remove a few damaged places underneath and the smooth out the cut edges.

BMW100606-08 BMW100606-09

I finally got to where I could slide on side underneath, so that I have a better feel for how this will end up. Not sure which side will get cut down, maybe both. It's good to sleep on it. I finished by giving everything a fresh coat of Metal Prep.

Sunday, September 13, 2009

Lotus license plate lights

I almost got the Lotus back on the road today. What I did get done was repairing the two rear license plate fixtures and getting the brake lights working again. That all needs to get done in order to get a safety check.

Both license plate light fixtures had a lot of corrosion and dirt. They really need more intervention. I would like to try POR-15 only it should be white -- heat from the bulb might be a problem. All I did today was clean the contacts and the case where the ground wire touches, and that took quite a while.

When the painter installed the lights he did not get the grounds right, including here. The ground connectors were under the plate nuts, making a very unreliable ground path. The right way is to put them between the case and the body, which means they are on the outside of the body. That is why they are bent so strangely.

Lotus090913-01 Lotus090913-02 Lotus090913-03

The problem with the brake lights turned out to be a connector at the brake light switch that had fallen off. Now the question is why it fell off. Time will tell.

Next week the duct tape business in front gets fixed, then this car goes back on the road.

As I was writing this, CSI: Las Vegas had a BMW coupe like mine. Sure dies look glamerous. Way cool!

Sunday, September 6, 2009

Lotus odds and ends

The wheel bearings are done so I am not including this in the series, however I still spent the entire day working on the Lotus. Nothing that warranted a picture, so no new pics today.

The reason I decided to replace the drive shaft u-joints was a broken nipple. I think the grease gun was the culprit. The first order of business today was greasing the four new u-joints. Rather than take any chances I used an odd-looking adapter the shop has. It does not clip to the nipple. Instead, you just press it really hard against the nipple. Sort of like an aircraft style needle fitting only the tip is concave. It did require a lot of pressure, and a lot of grease leaked out, but it worked.

During the time the car has been up on jack stands it leaked some oil onto the floor. Today I checked and it was transmission oil (the smell is the give-away). I still had a fresh quart from when I switched to Redline 70W90, and I was surprised that it took more than half to top off. I need to keep an eye on that. After the oil was in I washed the transaxle, first with solvent, then with a strong batch of POR-15 Marine Clean. Now maybe I can tell where it is leaking. After that I mopped the floor.

With the wet and messy stuff out of the way I could hook up a battery charger. At that point I thought I might be taking the car home at the end of the day, but it had been raining all morning and I hate driving the Lotus in the rain. After lunch it was still raining, more than ever, so I decided to install the LH rear side marker light assembly and get the RH one, which I had already installed, wired into the harness. To get these after market pieces to fit required cutting away some of the brass that forms the receptacle for the ground wire and filing the holes in the body to get more clearance.

There are two more things I really ought to do: fix the rear license plate lights and repair the loose duct tape at the front of the brake line access bay, which runs under the car right down the center. Lotus used some really sticky, wide tape here. Good old duct tape is the best thing that is readily available. I wonder if there is any difference between duct tape, gaffer's tape, and 200 m.p.h. racing tape?

The rain never stopped, so the car is still there. Next week, for sure!

Monday, October 8, 2007

Digging under the dash

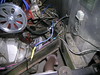
Soon after I bought this E9 I discovered that the electrical system had a few problems, and while pursuing those discovered the wiring under the dash was a mess. Somewhere along the way this car must have been fitted with a radar detector, a different radio, perhaps even a microwave oven. Non-original wire was hopelessly tangled up amongst the steering column, brake pedals, and original fuse block. The fuse block was not attached to anything, apparently because the bracket had rusted away.

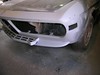
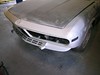
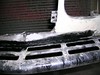
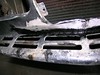
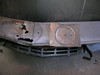
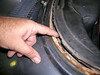
The first thing I did yesterday was to remove the windshield. Happily, the rust under the rubber seal was not as bad as I had feared. Nothing like in back.

I decided that to inspect and treat this area properly I had to remove the upper dash panel. It seemed straightforward, except that it was stuck in the inverted "U" shaped piece that shades the tach and speedo. According to my book, that piece is held in place by one upwards facing screw on each side. I think that part of my book is actually about the Bravaria, because on my car that hood is attached by a forward facing stud and an 8mm nut. At least on the left. After removing the nut the piece still would not come off, but the right side was blocked by the center console, radio, and air vent.

I decided it was time to dig into the dash. Finally I would confront that tangle of ugly wires.

The radio came out easily. It was not original. I think it was an 8-track, and I saw some snarled tape in the load slot. Into the rubbish it went. I saved the mounting tray and front panel, as those were original.

Next I discovered my door window switches are not all the same. From the top they appear identical. Underneith, the front pair look like the ones in the book, with push-on terminals, but the wiring is not original. Well done, but all of the wires are red vinal. The rear window switches plug into sockets. I discovered that after removing the switches I could push the sockets down and forward enough to reach the screws shown in the book. Except only the left side had a screw. One PO must have subscribed to the philosophy that where two fasteners were used, one should do, as I have found this in other places.

As it turned out I had to remove three more screws not metioned in the book, which go through a pair of braces that connect the sides of the console. I also had to remove the glove box switch. Underneith I found the original sockets for the front window switches, with red wires neated tapped on.

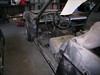
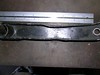
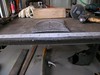
Even before I had the console out, as soon as I lifted the thin wooden plywood "bottom" under the radio, I ran into a pile of wood shavings. I thought a mouse must have taken up residence. It turns out the mess came from a dilapitated pressed-board bulkhead that was once attached to the front of the console and prevented objects placed on the wooden bottom from sliding off into never-never land.

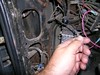
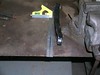
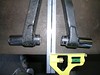
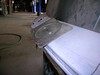
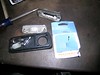
Anoth piece I took off was the access panel under the steering wheel. It has three switches mounted on it. The two large round switches are push-on/push-off, and when on the button stickes out. The one on the left is green, and I am pretty sure it turns on the emergency flashers. The one on the right is yellow and seems to be for the front fog lights.

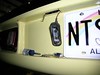
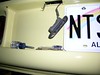
My car has an "extra" rectangular red light in back, just inside of the left tail light. I think it is the rear fog warning light described in the wiring diagram. According to the diagram this light has its own switch, and I think that is what the small round switch on the right side of the driver's access panel is for. It is marked "8" and pops out when a small tab at the base is pushed. It reminds me of an aircraft circuit breaker.

There are times when I am working on the car that I feel as though there is too much to do, and that I will never get it all done. I have heard other people say that a major renovation such as this poses a uique challenge in that it takes so long without giving anything back. We humans are motivated by success. In the middle of a project like this one, success is scarce and setbacks, like my broken windsheild, all to common. I find it helps to imagine my car all clean and beautiful again, and to pause and reflect on the good work accomplished each day.

BMW100707-02.JPG 
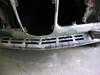
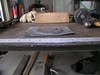
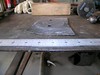
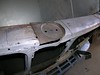
Time to remove upper dash

BMW100707-09.JPG 
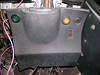
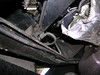
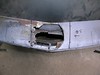
Panel under steering wheel contains three switches. Green is emergency flasher (?) yellow is fog light, small red switch might be rear fog light.

BMW100707-12.JPG 
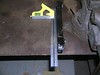
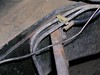
Back side of steering wheel panel. Note odometer reset along left edge.

BMW100707-15.JPG 
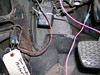
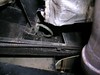
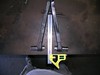
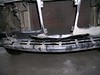
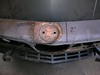
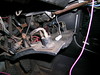
Driver's side foot well. What a mess!

BMW100707-23.JPG 
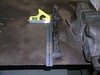
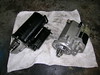
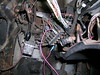
Console out. Wood dust is from dilapidated pressed board at front of console (see wood screws) possibly a PO repair. Not serious.