Last weekend my wife and I went on the annual Frank Smith Ride to Hana. I suppose I could call it Frank and Laura Smith ride, because Frank's wife almost always goes. You can see the photos I took on my Flicker site.
The trip begins on Friday with flying to Maui. From Kahalui airport we ride fifty miles to Hana. Saturday is rest and have fun day, and on Sunday we ride back and fly home. Those fifty miles include some of the most beautiful scenery to be found on any rode, anywhere.
Today it was back to the old routine. I worked on the Lotus. The last session ended with getting the trailing arm installed enough to get the hub on. Today I finished the job: I hooked up the brake hose to the pipe on the trailing arm, connected the other end of the pipe to the wheel cylinder, attached the drive shaft to the trans-axle, installed the bolt that connects the lower link, hub carrier and shock/spring unit, bent down the lock washer on the hub retaining bolt, installed the brake drum, and bled the brakes.
Next week will begin with a test drive, but after that I need to piddle around with some lighting issues and get the safety check renewed. Then I can take it home.
Sunday, August 30, 2009
Sunday, August 16, 2009
Lotus rear hub bearings, pt. 7
Short day today because at 4:00 my wife and I met with Frank and Laura Smith and the rest of the Hana Ride gang for a shake-down ride around Tantalus, in preparation for next weekend's ride to Hana. Which means I won't get any work done next weekend.
Fortunately today was one of those days when things go well. My goal was to get the hub on, so that the Loctite would have plenty of time to cure. I made it with a little time to spare, which I used for a much needed rest.
I started with installing the new braided steel brake hose. No problem there. On the RH side I left the steel brake line that runs along the top of the trailing arm in place. The LH side only had one clip remaining, so I removed the line to paint the trailing arm. Getting the line back into the clip was ridiculously difficult, but I managed.
The real work was installing the forward bolt, the one the arm pivots on. The RH side was just hard. The LH side was as close to impossible as possible. The problem is the length of the bolt. Lotus should have made the cave in which all this takes place 1/8" wider, or used a slightly shorter bolt.
Since getting the hub on was the goal, connecting the brake hose to the trailing arm was not on the critical path so I left that for later and moved on to the brake backing plate. On the RH side I had a terrible time getting the four bolts threaded into the cast aluminum carrier. As luck would have it, only one on the LH side was a problem. All it needed was a lot of pressure pushing into the hole while gently turning. In situations like this, a steel bolt going to an aluminum casting, I always use anti-seize.
With the backing plate in place I could install the hub. Yes, I remembered the spacer! I thought I could do it without connecting the lower link, but before I got close to 150 ft. lbs. the hub was twisting more than I was comfortable with -- I did not want to damage the rubber mount -- so I stopped to put in the bolt that connects the lower link to the hub carrier. I did not need it tight, just in the hole. It was very hard to get out, and today, again, it was very hard to put in. I need to check that out next time.
Sunday, August 9, 2009
Lotus rear hub bearings, pt. 6
The big excitement around here has been the approach of hurricane Felicia. On Friday it was a Cat 4 southeast of the Islands, on course to roll right over us. As it moved north the ocean temperature fell, so it is now a tropical storm. By the time it gets here it may well be a tropical smoothie.
My goal for today was to get the suspension assembled and in. I knew it was a stretch, and it was. I got as far as getting it ready to install. Even so I'm not disappointed.
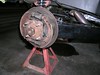
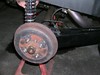
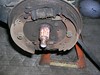
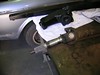
I have some pics from previous work. First off are two pics of the backing plate installed, and at last is a shot of the RH side ready for its wheel. Think of it as closure.
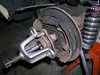
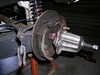
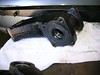
Removing the RH hub was a lot harder than the left. I had to use a heat gun to heat the hub to break the Loctite (as described in the workshop manual). Even then, getting it off was a battle. I did not want to use my lug nuts with the puller for fear of damaging them, so I dug up some junk nuts and washers. The washers were destroyed in the process. In the last pic the remains of the Loctite is clearly visible on the splines.
Today I took a few more pics of the u-joint removal, because the last ones I took did not show the best technique. It works better to clamp the press in the vise. Each time a bear cap was almost out I stopped pressing, clamped the cap in the vise, and tapped the yoke up and off. Another trick was to use a socket to take the place of the first cap removed, so that pressing back against the second cap doesn't push the spider off-center and crack the cap. Which it was.
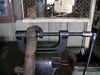
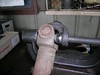
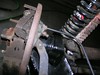
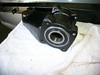
Lastly, a few pics of the painted trailing link and hub with the bearings in, and a pic showing how I pulled the drive shaft into place.
Next time will begin with installing the brake pipe -- I'll need to buy some long cable ties -- and installing the new braided steel hose.
My goal for today was to get the suspension assembled and in. I knew it was a stretch, and it was. I got as far as getting it ready to install. Even so I'm not disappointed.
I have some pics from previous work. First off are two pics of the backing plate installed, and at last is a shot of the RH side ready for its wheel. Think of it as closure.
Removing the RH hub was a lot harder than the left. I had to use a heat gun to heat the hub to break the Loctite (as described in the workshop manual). Even then, getting it off was a battle. I did not want to use my lug nuts with the puller for fear of damaging them, so I dug up some junk nuts and washers. The washers were destroyed in the process. In the last pic the remains of the Loctite is clearly visible on the splines.
Today I took a few more pics of the u-joint removal, because the last ones I took did not show the best technique. It works better to clamp the press in the vise. Each time a bear cap was almost out I stopped pressing, clamped the cap in the vise, and tapped the yoke up and off. Another trick was to use a socket to take the place of the first cap removed, so that pressing back against the second cap doesn't push the spider off-center and crack the cap. Which it was.
Lastly, a few pics of the painted trailing link and hub with the bearings in, and a pic showing how I pulled the drive shaft into place.
Next time will begin with installing the brake pipe -- I'll need to buy some long cable ties -- and installing the new braided steel hose.
Sunday, August 2, 2009
Lotus rear hub bearings, pt. 5
It's been awhile since I wrote anything. Mostly this is a result of a crazy busy schedule, but health issues have played a part, too. This week, both are back to almost normal. Another reason is that I have been working on the Europa's left rear wheel bearing, which is a repeat of what I just did on the right side. On top of that I am busy re-learning the Smalltalk language and a new version, called Squeak, my goal being to teach a class of high schoolers. This is in conjunction with the Open Slate Project.
Something not a distraction but noteworthy is news that my eldest son has flown the coop. Gone away to California to make his fortune. He got a job a bazillion kids want, to be a game designer at Upper Deck. That business segment has seen some rough water this past year, so I gave him a pep talk about being on the team that turns things around. I wish him and the company all the best. He currently has a blog up about his adventures; don't know how long it will stay up.
Last week I got the trailing arm off the car. A bit of a snag getting the forward brake line off, I ended up disconnecting the top. For some reason, corrosion most likely, the long bolt that secures the lower link to the hub carrier was hard to remove.
Today began with pressing the drive shaft out of the bearings. It provided a first-hand example of the value of this blog -- I could go back and review the press setup I used on the other side. I tried to do it myself, but juggling the part and four long sockets was too much, so Carl gave me a hand.
I was going to jump right in on the universal joints until I realized that paint was on the critical path. I set aside the drive shaft and instead knocked the bearings and seal out of the hub carrier, cleaned it in the solvent wash, then did the whole long clean and prep drill on it and the trailing arm in preparation for paint. As I recall, last time I painted the inside and outside of the trailing arm on different days. Today I did both, inside first. Once again my solution was to pour Rustoleum straight from the can into the trailing arm, then turning and twisting to coat the inside. Messy but effective. After hanging up like a smoked ham for an hour the paint stop dripping out the end, and I sprayed it and the hub carrier. They will be ready to assemble next week.
Even if I get everything put together next Sunday I will not be able to drive the car, because the Loctite has to set overnight before putting a load on it. Maybe I can take a day off this week and at least get the hub on. Too bad that step happens so near the end.
Subscribe to:
Posts (Atom)