Sunday, December 27, 2009

Toyota tie rod bearings

Last Wednesday's work solved some of the Camry's problem, but there was still a lot of one-per-rev thunk-thunk. It sounded to me like a worn rear wheel bearing, except the sound obviously came from the front. The other thing it sounded like was a worn -- read "broken" -- differential. Given the Camry is FWD this all made sense.

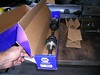
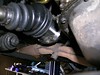
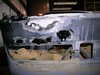
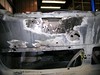
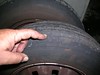
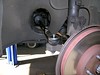
Yesterday I picked up new front wheel bearings and retaining rings, $140 at NAPA. The hard part of the job sounded like pressing out the old bearings, but the shop has an excellent hydraulic press. When I removed the wheel I noticed that it was not just worn, some of the steel belt was starting to show through. Carl, the shop manager, expressed some doubt that my problem was with the bearings and suggested I go far enough with the RH side to where we could get a good feel without removing the hub.

Toyota091227-01 Toyota091227-02 Toyota091227-03

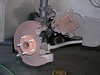
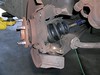
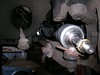
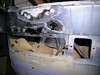
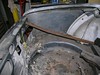
With the caliper out of the way, the disk off, and the hub removed from the driveshaft it was possible to check the bearing and it was perfect. No sign of the 125,000 miles on it. Obviously not the source of problem. As I was putting everything back I discovered what turned out to be the problem, worn tie rod end bearings. The LH side was fine; nice and tight. Not only was the RH side loose, when I rocked the hub side to side it made the same sound I was getting on the road. NAPA had the parts in stock, so I put the car back down, grabbed some lunch, whizzed back to Kaimuki and exchanged the bearings for the LH inner and outer tie rod bearings. The good folks at Larry's even gave me $50 back, in cash!

Toyota091227-04 Toyota091227-05

Toyota091227-06 Toyota091227-07

Toyota091227-08 Toyota091227-09

I actually hate being in situations like this. I had four hours to do a job I have never done before on the only usable car in the family, and the shop is closed on Monday and Tuesday. Do or die. It does help in getting things done.

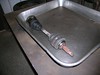
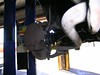
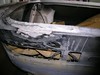
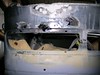
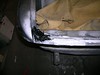
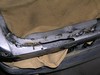
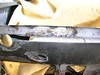
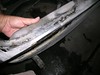
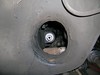
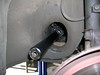
Right off the bat I hit a snag. The inner end of the steering rack boot is held on by a one-time steel band. It has to be cut off without tearing the boot. Not enough room for long handled cutters, not enough leverage from my short handled dikes. (Did you know that dikes is a portmanteau of "Diagonal CutterS?" Thank you Wikipedia.) I spent an excruciatingly long time on this.

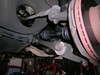
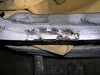
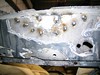
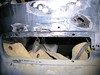
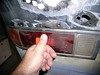
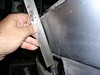
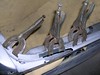
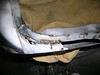
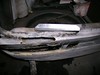
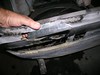
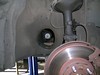
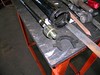
Before removing the outer rod end bearing I counted the number of exposed threads. With the rod end and boot removed I could see where the lock washer was bent over the two flats on the inner bearing retainer, but getting to them to straighten them out seemed impossible. Luckily I found a funny shaped punch that fit perfectly.

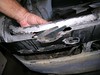
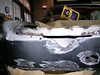
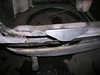
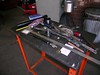
There was no way to get an open end wrench on the retainer. Hardly enough room for a crow's foot wrench, and none that big available. Luck for me the shop has a nifty tie rod tool that made the job a piece of cake.

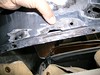
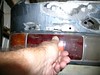
On the bench I reassembled the old rod end so that there was the same numbered of grooves showing, measured 15 1/8 in. exactly, assembled the new set, and counted the grooves. This was where it needed to be back on the car.

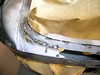
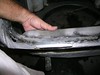
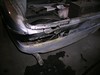
There were no snags after that. I used a long tie wrap to secure the boot. The car now drives smooth, tight, and quiet. I do need to replace that tire.

Wednesday, December 23, 2009

Toyota drive shafts

In the last few days my wife's Camry station wagon has been making terrible noises and the steering began to wobble. I decided the drive shafts had finally gone, after 125,000 miles. It got bad so suddenly that I decided it was not safe to drive. Naturally my son was due in from California last night, so a reliable car was essential. I rented us a car from Enterprise and bought new drive shafts from NAPA. Today was fix the Toyota day.

For several months I have wanted to get my wife another car and junk the Camry. Since getting it I have replaced
  • Alternator
  • Battery
  • Water pump
  • Brakes
  • Exhaust system
  • Seat belt retracter computer
  • Brake light switch
  • RH tail light assy.
  • Reverse lock-out switch
The good news is that all these things are available, and the car is easy to work on. Toyota has received a lot of praise for this car's design, and it is deserved. The bad news is that each item took one or more days of my time, and I have other things to do. What we need is a reliable car. One solid, dependable car. My Lotus and the E9 are more than I need.


Just as this crisis was unfolding a prospect appeared. A 1994 BMW 530i Touring (which means station wagon in German). The price was in the ball park. I went to look at it yesterday, all set to buy it thinking it would turn lemons into lemonade, but it turned out to be a bit of a lemon itself. It took all of my will to turn it down. The problem was the paint. It had been painted, a cheap, used car lot kind of a job, and already there was rust breaking through the bottom of the RH back door. I do not need another rusty BMW; one is enough.

Toyota091223-01 Toyota091223-02

Toyota091223-03 Toyota091223-04

Toyota091223-05 Toyota091223-06

The drive shaft replacement was easy. The book made it sound a lot harder -- must have been an older model. It still took me several hours, but I was afraid it would run over into Saturday, the next time the shop is open.

When I drove the car it seemed much improved, but not cured. There is still some noise and some wobble. I guess there were multiple things wrong.

Based on the noise as it sounds now I think the next thing to replace are the front wheel bearings. After doing the drive shafts today I regret to say that the first part, removing the hub from the drive shaft, will have to be done again. At least the procedure is fresh in my mind. If that does not cure it the only thing left is the transmission, and that would bring us to the end of this car's story.

Sunday, December 20, 2009

Better welding

BMW091220-01 BMW091220-02 BMW091220-03

I started right off welding today. The guy working in the stall next to mine offered some advice ... turned out he is a certified welder. He came over and taught me some stuff about starting and holding a bead. Interesting to listen to the sound of a good weld. He said I needed more heat because I was spot welding, so I turned up the juice from 4 to 5. At this setting I get good penetration of the new sheet metal, but the original burns through easily. The trick is to concentrate the heat on the thicker material.

BMW091220-04

After the welding came the grinding. More than usual because of the spots on the outer surface. Then I applied a liberal layer of POR-15 Epoxy Filler. I have been using this batch for a long time and it is finally starting to feel "dried out." I have a new box.

BMW091220-05 BMW091220-06

After lunch the filler was still too soft to shape so I got started on the next section, filling in some smaller holes with fiberglass and POR-15. In the photos some of the holes look round -- this is because I opened them up with a tapered rotary file. On all but the last I applied the cloth on the inside and will bring it up level with filler.

I wanted to try a different filler but when I went to Redline their paint department was torn up. Now I see some new products on the POR-15 web site and want to give them a try. The STRAIGHTLINE Body Filler sounds right.

BMW091220-06 BMW091220-07 BMW091220-08

One hole is a problem in that it is located along the edge the the tail light flange. To see how much clearance I had, and how much was visible, I held the tail light in place. It is a relatively exposed spot, so I'll need to be careful.

BMW091220-09 BMW091220-10

Four small pieces of fiberglass cloth applied to the inside.

BMW091220-10 BMW091220-12 BMW091220-11

When it was time for the second coat of POR-15 I added one more patch, at the corner of the trunk gutter. Here I used two layers applied from the top. This will be hidden by the weatherstripping.

Sunday, December 13, 2009

Another Marathon

Today was the Honolulu Marathon and once again my wife and I volunteered to help Frank Smith with the clock starting team. This means getting up at 2:00AM, riding our bikes into Waikiki for final assignments, riding to our positions for the 5:00AM start, then scrambling to get outside the race course before the hordes arrive. We had breakfast at Big City Diner (love those Apple Pancakes!) When It was time to go to the shop I had been up for eight hours.

BMW091213-01

The first thing to do was to put some curve in the new patch. It fits inside a panel with a concave curve, the one I have been having trouble sanding, and without at least an approximation the fit at the top and bottom would be way off. A little work with a hammer and shot bag took care of that.

BMW091213-02 BMW091213-03

Now that the top went where it was supposed to it needed to fit better up against the underside. To achieve that I needed to trim away some of the top on the inboard end.

BMW091213-05 BMW091213-06

As usual it meant rough cutting with the dia grinder and a seemingly endless cycle of grind, file and fit, with walking back and forth from the workbench to the car. I should have invested in a portable workbench, except the one I use has a heavy steel top. Hard to beat.

BMW091213-07

When the fit was good it was time to prepare the host sheet metal for welding. Since the patch goes inside a doubler I cannot weld from the inside, so I had to drill holes in the original panel. This means more work grinding and smoothing, but it can't be helped.

BMW091213-08 BMW091213-09

Because of its location there is no obvious way to hold it in place while welding. The solution turned out to be a long iron bar that just fits through one of the holes in the doubler and presses against the folded edge of the patch.

At this point I was too tired to weld. The way I felt, if I tried to weld I would just make a mess and end up having to do it all over again. So, I doused everything with MetalPrep and called it a day.

Sunday, December 6, 2009

One patch welded, another on the way

BMW091206-01 BMW091206-02 BMW091206-03

During the week I got a new tank of gas, 75% Argon 25% CO2. Today I got it hooked up, did some practice welds, and finally got the patch that was ready last week welding in place. I would say this was my best welding to date. The first welds were making little balls, suggesting poor penetration, so I turned up the current a bit. The trick is to avoid burning through the original sheet metal, which gets pretty thin in places were it was stretched while forming. The edge of the trunk lid is one of those places.

BMW091206-04 BMW091206-05 BMW091206-06

BMW091206-07 BMW091206-08

BMW091206-09 BMW091206-10

The rest of the day went to the next patch, which will connect to this one to close the large hole beneath the gutter. This one is not curved so much but it does require two bends. Hard to do well without a break. This patch will fit inside and create a foundation for POR-15 Epoxy Filler.

BMW091206-11 BMW091206-12 BMW091206-13 BMW091206-14 BMW091206-15 BMW091206-16 BMW091206-17

Next Sunday is the Honolulu Marathon, and the shop is closing early. I might have to skip next Sunday altogether.