Friday, December 30, 2011

Floorpan not so good

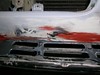
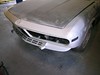
My respiratory system showed no unusual effects after Wednesday's session. Today was all about finishing; removing the last of the goo and paint and the usual wash and metal prep cycle, maybe even a coat of POR-15 paint.

BMW111230-01 BMW111230-02 BMW111230-03

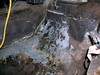
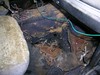
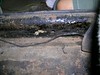
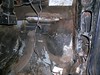
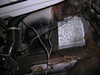
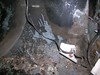
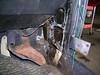
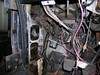
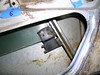
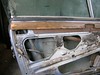
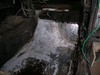
I tried using a scrub pad in combination with acetone, without much success. What did work well was to spread a "clean" rag flat, soak it with acetone, wait a minute then move it around just a bit, working the wet down into the goo. That plus some scraping on the thick spots and slowly it came off.

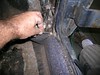
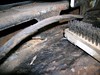
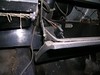
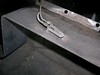
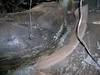
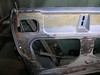
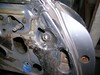
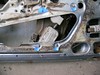
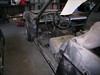
When the goo was gone I used a flap disk in the 4" grinder to remove most of the paint and some light corrosion. To finish off the last bits I switched to a wire brush in a die grinder.

BMW111230-04 BMW111230-05

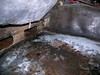
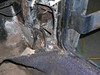
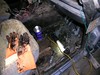
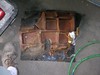
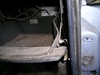
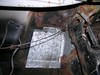
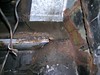
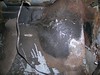
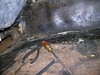
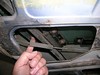
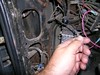
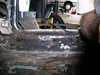
I was working on a rough spot with the die grinder when the brush broke through a spot, and underneath was all rust. The only way to be sure it gets taken care of is to remove the repair panel floor pan. Good news, if it can be called that, is that it is pop riveted in. I can't wait to see what's lurking underneath.

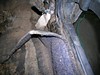
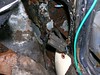
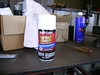
I did finish with a POR-15 clean and prep, if only to prevent any more damage.
posted from Bloggeroid

Wednesday, December 28, 2011

Ripping out old carpet

BMW111228-01 BMW111228-02 BMW111228-03
BMW111228-04 BMW111228-05 BMW111228-06
BMW111228-07 BMW111228-08 BMW111228-09
BMW111228-10
BMW111228-11 BMW111228-12 BMW111228-13
BMW111228-14 BMW111228-15
BMW111228-16 BMW111228-17 BMW111228-18 BMW111228-19
BMW111228-20 BMW111228-21 BMW111228-22
I will not be surprised if my asthma acts up tonight, or if my allergies go haywire. I pulled out a bunch of old carpet from the passenger's side of the E9 today. Filthy, rotten carpet. The bottom layer actually looked original, which would make it 38 years old. Dust. Mildew. Candy wrappers from my kids when they were in elementary school, which was, say, fifteen years ago.

It was not my plan to remove the carpet. I started out to work in the engine compartment, where I need to weld in a patch along the gutter by the rear RH corner. To do that I needed to check what was behind the panel. That was behind the glove box, so that had to come out. Except the glove box hinge was blocked by a pile of old carpet.

I had no idea the carpet had been glued to the floorboard. The mystery glue looks like creosote; hard, tacky, sticks to skin and hard to wash off. Softened by naphtha, better removed with acetone and a wire brush. The brush breaks off tiny balls which dry and can be vacuumed. I must have wasted an hour removing this stuff and the job is still unfinished. It has to come off for the POR-15 to stick.


The floor pan and part of the firewall have been replaced using galvanized steel, which appears to be in good shape. The edges were smoothed with some kind of filler, which has dried and shrunken considerably. That has to be re-done. Even the new floor has a few small rust holes, so it will get a layer of fiberglass as part of the POR-15 process.


I did remove the glove box. The inboard support still had the original pin and snap ring, but the outboard support was a bolt and nut. Only two lag bolts attached the hinge even though there are holes for three. Had to disconnect the light wires.


posted from Bloggeroid

Sunday, December 11, 2011

E-34 clock lights and mystery radio

Yesterday was too full of schedule conflicts for me to go to the shop or gamelan rehearsal. One of those conflicts was the Honolulu Marathon. The marathon was today, but my wife and I have for many years volunteered to be on the timing clock team and yesterday morning was orientation and clock synchronization.

The race went off prefect despite rain and thunderstorms throughout the night before. After breakfast I decided that due to the lousy weather I could not work on the Lotus, but I could work inside the E-34.

My recently acquired E-34 does not have an original radio. I had deduced as much because the front panel does not match the manual. I used my special, five sided "penta" wrench to release the lock tabs, pulled out the radio, flipped it over and found this label:


So, this radio is from a 97 318. What I need to find out are 1) the security code and 2) why my CD player is not recognized.

While I had the radio out I replaced two of the three light bulbs in the One Board Computer (OBC). All three were out but last week BMW Honolulu only had two in stock. Now I can actually read the clock!

Last Friday the car got new window tinting from T&T. Tomorrow it will spend the day at Dent Doctors having a bunch of little door dings removed. Next will come a good polish, them some touch up paint. Should turn out looking a lot better than I had expected.

posted from Bloggeroid

Saturday, December 3, 2011

Dirty kick panels

BMW111203-01 BMW111203-02 BMW111203-03
Today I got dirty. My goal was to soak both kick panels with POR-15 Metal Ready. To do that I had clean them with Marine Clean.

I used my garden sprayer to shoot the Marine Clean, then rinsed with a garden hose. Used an air nozzle to blow dry, and muck blew everywhere. When things were dry I knocked off the lose paint and rusty bits with a wire brush in the die grinder. More muck. Eventually I got it all done.

Need to return to this area and continue with the floor and firewall. Need to find a way to seal the gap between the original metal and the replacement floor.


posted from Bloggeroid

Saturday, November 26, 2011

Left door deconstruction

BMW111126-01 BMW111126-02
BMW111126-03 BMW111126-04
Finished deconstructing the LH door. Took a lot longer than the RH door due to a frozen lock nut on the upper stud that supports the heavy vertical section. Ended up splitting both with a die grinder. The stud was spinning anyway because the tapped hole was stripped. Another thing to repair when it goes together.

The rear bolt that holds the rear window bracket is extra short. Probably by design, to clear something.

Saturday, November 5, 2011

Finally got RH nose under control

BMW111105-01
I never did make it in during the week, as I had hoped, so I had to start by applying filler on the low spot I found last week.
BMW111105-02 BMW111105-03
While the filler set I worked on the LH door. I discovered there were no fasteners holding on the wood trim panel. I just tapped it up and free with a candy hammer. I also removed the window lift motor. Note the one short bolt in the photo.
BMW111105-04
When the filler was ready I spent what time I had smoothing it and the surrounding area. I went ahead and applied a coat of etching primer and a coat of white enamel even though the area is not ready or finish paint. This coat is there as a moisture barrier, to prevent new rust while I work elsewhere.

Friday, November 4, 2011

On the way ... '94 E34 wagon

Just a quick note to announce a new addition to my stable, a '94 E34 wagon. Not nearly as lovely as the E9, a beast to the coupe's beauty, but a grand replacement for my dilapidated van. I plan to pick it up Sunday and pick up some plastic storage boxes to take the place of the cardboard boxes in the van. Everything works except the A/C, and with a little luck I can get that going.
posted from Bloggeroid

Saturday, October 29, 2011

RH nose, air dam, almost ready

My goal for the day was to duplicate on the right side what I had done on the left, namely bring the repairs to a close and put down a coat of real paint to block moisture as I continue working elsewhere. This does not mean the area is finished and ready for paint. More like ready to start wet sanding as prep for paint.
BMW111029-01 BMW111029-02
Well, I didn't get that far. There are some tricky spots remaining. Most notably a deep groove along the joint between the panel beneath the grill opening and the air dam, caused by a fiberglass patch. In the close-up pic it is below the black fiberglass patch in the center of the pic. I got as far as being ready to apply filler but was out of time. Hopefully I'll do that during the week.
posted from Bloggeroid

Saturday, October 15, 2011

LH door off, LH nose painted

Had a good day today. The kind of day where everything just works. Finished everything I planned to do with time to spare, so I had a relaxed lunch with my wife.

I bounced back and forth between painting the nose ... what I wanted to do last week ... and removing the LH door.

BMW111015-01 BMW111015-02 BMW111015-03 BMW111015-04 BMW111015-05

I used a #6 metric hex wrench on that special hinge bolt, and to get better grip I cleaned off the paint with a small, pointy wire brush in a die grinder. Came out easy.

On the RH side the door window motor ground wire on the inboard end was attached to the frame with a screw. On the LH side things were different. The original ground wire was extended with a sliced in section, then went to a multi-terminal ground point which was not connected to anything. Odd.

BMW111015-06 BMW111015-07 BMW111015-08

Wiped down the nose with acetone, applied two coates of acid etch primer, them two coats of white finish paint. This area is not finished, I just want to keep moisture out.

Next week I need to get the RH nose to the same level of completeness and disassemble the LH door.
posted from Bloggeroid