Monday, November 26, 2007

POR-15 Rear Window Area

Yesterday I set out to treat the area around the rear window opening with POR-15. The bottom and sides. I'll do the top when I do the rest of the interior roof. This is in preparation for welding in the new section between the bottom of the window and the forward edge of the trunk.

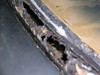
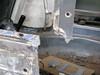
The flange that the window sits on consists of two or three layers of sheetmetal spot welded together. Along the right vertical joint (the C-pillar) the gap is filled with lead, but along the bottom and left side there are many gaps.

BMW112507-01.JPG BMW112507-02.JPG BMW112507-03.JPG

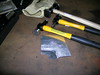
The first task was to remove the old paint and what little loose rust was present. For this I used a die grinder and at first a synthetic wire wheel followed by a real wire wheel. After blowing all the dust away I washed the area with Marine-Clean, and when that was dry I brushed on a coat of Metal-Ready. The instructions said to keep the area wet for fifteen minutes so I kept going around and around.

BMW112507-04.JPG BMW112507-05.JPG

Up to this point everything worked fine, but here is where I ran into the problem I was concerned about. I gave the Metal-Ready coat an hour to dry, and after an hour it was still tacky. I had to call it a day without applying any POR-15.

The shop is closed Mondays and Tuesdays, so it will be Wednesday before I can even attempt to apply a coat of POR-15. This area deserves two coats, which means going again on Thursday.

Painting projects are difficult for this reason, especially when you only have one day a week to work on them. Surface prep takes a long time, and waiting for something to dry chews up big chunks of valuable time. maybe a hair dryer would help.

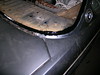
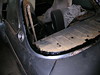
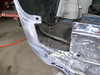
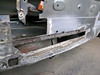
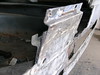
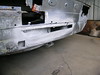
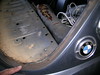
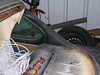
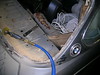
Update: Pics to show how POR-15 turned out. First two show zinc (white splotches) where Metal-Ready converted rust, before applying POR-15. The rest show treated area. POR-15 brushed on easily.

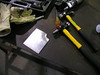
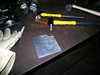
This job used no more than half of the very small can of POR-15 that came in the starter kit. I poured it out into a clean soup can. After I was done I did not bother to clean up, just tossed the tin can and brush.

BMW120207-01.JPG BMW120207-02.JPG

BMW120207-03.JPG BMW120207-04.JPG BMW120207-05.JPG BMW120207-06.JPG

Sunday, November 18, 2007

More Hammering

Last week the shop was closed for Veteran's day. Today the news was that the plasma cutter is still broken, so I spent my time finishing that little patch I started last time.

This is a patch for the lower right corner of the left tail light. The opening in the body is flanged, and the corner appears to have been radiused to follow the weather striping. I cannot say for sure because both sides have rusted out. The sections that remain have sharpe, 90 degree "Z" bends. The left side of the opening is curved to follow the form of the light fixture, and there the angles are less severe.

BMW110407-02.JPG

My guess is that this corner also was not as sharp as the section that remains. Even so, to get a good fit my patch needs to start with sharp bends. The top part (right side of opening) is easier because the indentation is only3/16 in. The bottom is harder because it is deeper, 3/8 in.

BMW110407-08.JPG

The photo below shows the result of a day's work. Basically I shrank the upper surface and streatched the lower, working the softly curved bends with the pick hammer to sharpen the bend. The shrinking hammer is the one with the teeth, which leaves the surface sparkly.

BMW111807-01.JPG

The next photo shows a side view of the deeper side, which will go at the bottom of the tail light opening. The top bend is sharp, but the bottom is stubornly soft and the narrow piece in between runs at about 45 deg. instead of 90. Even so, this might be good enough. All I need is for the light to fit and the bends to be covered by the light fixture.

BMW111807-02.JPG

Sunday, November 4, 2007

Hammering Away

The plasma torch still is not fixed so I shifted my attention to the troublesome rear panel. I had planned on using the flange tool there instead of my original idea of welding in backing plates.

Looking at the area again, with the tool in my hand, I had to admit that the job was not as straightforward as I had thought. The damage around the tail light will require some complex patches. I decided to start with the long, narrow slot I had cut just below where the trunk floor attaches to the rear panel.

I had tried to remove as little material as possible. My problem now was that I could not get the head of the flange tool through the slot, so I used a die grinder to cut the slot wider.

The Harbor Freight flange tool works great. The only problem I had was with paint getting stuck in the jaws. I ended up grinding the outside down to bare metal with my 4" CP grinder. I finished with a coat of Rust-Prep followed with a coat of 3M Weld Thru Primer.

I spent the time waiting for the Rust-Prep to dry banging on a piece of steel with my new hammers. I chose a rediculously difficult task, the compound curve I will need to make at the lower inboard corner of the left tail light opening. It turned out better than I expected, although it is far from adequate. You have to start somewhere!

BMW110407-01.JPG BMW110407-02.JPG BMW110407-03.JPG

BMW110407-04.JPG BMW110407-05.JPG BMW110407-06.JPG

BMW110407-07.JPG BMW110407-08.JPG BMW110407-09.JPG

BMW110407-10.JPG BMW110407-11.JPG

Get Up and Go

It is a rainy Sunday morning. I don't know if Carl got the plasma torch fixed and without it I have nothing to hammer. Good excuse to stay home and watch New England, The game begins at 11:00 so if I watch it I won't get any work done on the car.

On the other hand the crimpper I ordered from Harbor Tools arrived, so I can start flanging those holes in the rear panel. I really should go and get something accomplished.

Body Tools

At this point in my project any progress seems noteworthy. I am pleased to report that on Friday I bought a six piece hammer and dolly set. I found it at Redline Automotive in Kalihi. It's the set used by the students taking the auto body repair class at Honolulu Community College and consists of three hammers and three dollies, along with a nice carrying case.

What I didn't see was a shrinking hammer, although one of the dollies is described as a shrinking dolly. I picked up one at Larry's Auto Parts in Kaimuki. Would you believe the parts man didn't know what a shrinking hammer was? It must be a good one because it cost as much as the set.