Sunday, October 26, 2008

Left Tail Light Patch

For the first time in a long time it rained today. Long and hard, the kind of rain that replenishes the soil and turns the grass on the slopes of Diamond Head green. Just the kind of day that caused me to worry about primer rust-through. I actually wrote my previous post about painting over primer earlier in the week, but never managed to upload it from my Newton until just now.

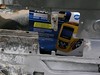
My day began with a bit of shopping. The shopping that I was going to do yesterday, but it was my younger son's birthday and that involved a lot of shopping at places that don't sell automotive painting supplies. I picked up a new box of disposable latex gloves, and a spray can of white, general purpose automotive enamel. Even though I had the paint I decided it was too humid to use it. If I had I would have ended up locking in moisture rather than keeping it out.

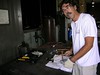
My goal for the day was to attach the patch for the lower right corner of the left tail light opening. The previous patch around the fog light would anchor this one. The guy working next to me was replacing the headliner in his mini-van, and certainly seemed to know what he was doing. He reminded me that for bare metal the first thing to to use is acid etch primer. I should have used that on the window seal, but besides just flat out forgetting, that job required the application of Epoxy Putty over bare metal, so all is not lost.

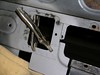
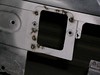
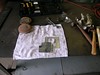
The first thing to do was to cut away the part that will be the lower left corner of the fog light. To ensure I had it fit correctly I stuck the tail light assemble into place. With the recess I previously hammer formed just touching the rubber seal, I marked where the opening needed to be cut. The job of finishing the cut was made much easier by a new find, a rotary file for the shop's little die grinder. It made forming the corner much easier than when using a rat tail file. The last step was to punch a series of holes to weld through.

When the patch was fit I used the die grinder's wire brush to remove the Weld-Thru primer left over from last week, wiped the area with acetone, and shot the mating surfaces with Weld-Thru primer. The plan being to shoot the inside with Weld-Thru as temporary fix until I can do it all with POR-15, and to shoot the outside with acid etch primer.

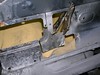
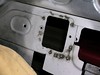
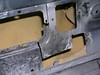
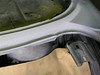
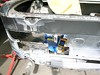
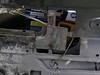
The welding went fine. The pics show a before and after, from different views. The application of the acid etch primer did not fare as well. I managed to get one little fush from the can, then nothing. It wasn't the nozzle that was plugged, it was than can itself. Why? Because the can, still full, had a date of manufacture of 2004. So my only choice was to spray the outside with Weld-Thru primer, too. Next week I get to remove that and use some fresh acid etch primer.

BMW102608-01 BMW102608-02 BMW102608-03

BMW102608-04 BMW102608-05

Sealing the Primer

When I left off work on the rear window sill I had shot it with a generous coat of high-build primer. Since then I got to thinking that in Hawaii's climate, moisture will work into the primer and ruin all that hard work, even though the car is indoors. So I was thinking I should shoot it with some real paint. I checked with the expert at Redline and he agreed.

One term in the equation is how long the car will sit unpainted. A few days is not a problem. A few months is. Right now this is an easy call ... months, if not years! The thing is, whatever I use needs to be compatible with the finish paint.

Monday, October 20, 2008

Weld-Thru Primer Is Fragile

While working on the E9 yesterday I noticed something about the 3M Weld-Thru Primer I first saw while working on the rear window sill. This paint is extreamly fragile. I admit I did not use washeres with the bolts that held the patch in place for welding. Even so, the damage done by the wrenches is clearly visible in the second photo from yesterday's session. This confirms the advice I got from the experts at Redline Automotive, where I buy all of my paint supplies, which is that this coating must be removed before applying anything on the path to a permanent finish. Fortunately, the same characteristic that requires its removale makes is easy to remove.

As I was working in that area I was once again concerned about how to refinish the area behind the doubler with the large holes. It seems to me that if the existing finish is intact, all it needs is a good cleaning before applying POR-15. I am assuming that even though the finish is intact it is too old to reliably protect against moisture penetration.

Application with a conventional spray gun is out of the question due to the many hidden pockets and crannies. Brushing will be difficult for the same reasons. I am thinking about using a hand pump garden sprayer and a custom made sprayer, a tube with small slots cut into the sides. I recall something like this in a book on how to prevent corrosion. Perhaps if I had done what the book recommened I would not be in this situation.

Sunday, October 19, 2008

Rear Fog Light Patch

Today's work was to weld on the patch backing plate behind the rear fog light, the rectangular opening just inboard of the left tail light. Last week I thought it was ready to go, but a closer look this morning revealed that the opening needed to be enlarged. When that was finally done I used my new set of Craftsman carbide drill bits to drill the two holes that mount the light (the left mysteriously larger than the right) then punched some welding holes around the edge. After a thorough cleaning with acetone I scuffed up the surface with #40 sandpaper and shot it with 3M Weld-Thru Primer. I also ground and wire brushed the paint off of the area inside the trunk where the patch was going, and hit that with Weld-Thru Primer, too. When all was dry I held the patch in place with a couple of bolts and nuts, spread out my burn-proof blanket, and welded it on. I took two pictures, one just before welding, the other after the bolts were removed.

Next week begins with grinding the welds and applying another coat of primer. After that comes fitting and welding the patch for the corner of the tail light.

BMW101908-01 BMW101908-02

Sunday, October 12, 2008

Return to Patch Making

Before I get into what I did today I want to acknowledge Steve O'Neill for his effort in making the E9 club badge I wrote about last time. Steve was kind enough to offer to hold on to mine until my E9 is back on the road. I decided he might not actually want to wait that long, and it might just inspire me to have, so I mailed him a check. Thanks, Steve!

Today I finally remembered to bring my camera tripod, so the first thing I did was to take some pictures of the window sill without flash. I'm still not satisfied. The light from the open bay door did not reveal the surface shapes. I only uploaded two pics, the places I worked on last week.

BMW101208-02 BMW101208-01

Last week was spent filling in low spots. Some were just glitches, but two affected the actual shape of the piece. Both were where the new material blends into the existing surface near the corners ot the trunk lid. After roughing up the surface with 100# sandpaper I built up the low spots with Epoxy Filler, waited an hour, and just as the instructions promised the filler was set and ready to work. I can't say enough about POR-15 Epoxy Filler. Fantastic stuff.

Even though the window sill needs a little more work, I decided it was time to bring some other problem areas to the same level. I had already started on the back end, so I went there.

BMW101208-07 BMW101208-08

Since starting to do hammer forming I picked up a couple of small shot bags. I used one and a sharp ended hammer to tighten the bend that creates the inset flange for the tail light.

BMW101208-03 BMW101208-05

BMW101208-06 BMW101208-04


(The greenish-yellow light is not the sheet metal, it is caused by the mercury vapor lights. That strange looking old man holding a hammer is me.)

As I worked I developed a plan for how these patches would fit together. Rule #1: Fit for ease of welding and strength, then fill in the gaps with Epoxy Filler. Corollary: Do not waste time getting a perfect fit.

So far I have two patches almost ready for welding. One goes behind the opening for the rectangular rear fog light. The other, with the hammer formed flange, repairs the lower right corner of the left tail light. The fog light piece will end up behind part of the tail light piece. The last of today's photos shows them roughly in place.

BMW101208-09