I started off trying my hand at cutting away a rusted spot using a shop die grinder with a cut-off wheel. I wanted something easy, so I picked a spot along the lower edge of the left tail light. Easy.
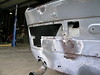
I decided to try another spot and moved a little to the right, with visions of having the rear of the car looking like Swiss cheese by the end of the day. I just started the second cut when I noticed that the lower right corner of the tail light opening was rusted away. Same for the lower left corner of the odd rectangular red light just inboard of the tail light. I decided that before I removed anything more I needed to plan out my patches.
I ended up making a simple, flat backup piece to reinforce the hole for that odd rectangular light. I thought I would use the shop's plasma torch but Carl (the manager) thought I should use a die grinder. After making this one I definitly want to try the plasma cutter, because this way took a long time. I can understand using the die grinder on the car body, where the torch would have melted the wiring harness still in the neighborhood.
One tricky aspect to this spot are the sharp, shallow bends around the tail light opening. The bottom one continues to the opposit tail light. I decided that reproducing these bends is impractical, so I will construct the step using two layers of sheetmetal.
It may not look like much, but with a project like this you have to expect forward progess in small steps. If I were a commercial shop working at this rate I'd be broke in no time.
The next big decision is how to attach these pieces. The shop's welder is not up to the task. I might buy my own, but not before I decide to go ahead. Another possibility is to use epoxy.
One more thing. As I was removing the rear trim strip I discovered that to get at the nut on the front bolt I had to remove much of the interior. I have included two photos of that. The rest illustrate today's cutting and patching.

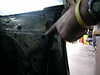 Trim strip nut
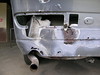
 First cut in body.
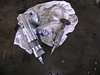 Left - my grinder, right - shop die grinder with cut-off wheel.
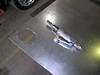 Patch after center rough cut with cut-off wheel, die grinder fitted with rotory file.
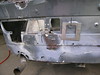 Finished patch hanging next to location, will go on back side.
1 comment:
A couple of quick suggestions:
Sometimes using old fashioned tin sniips is quicker, safer, and more accurate than power cut off tools.
Lap seam pliers are invaluable for small patch workk like you are presently involved in.
My experience tells me (as well as internet posts) that there is really no substitute for old fashioned welding. Epoxies and other such methods work but usually are messy and reguire some amount of set up time.
I have used a spot welder rather extensively. It is ideal in situations where you have access to both sides of the metal. Zero learning curve and no other supplies needed.
Similarly, a MIG welder is invaluable. Not too hard to learn, pretty cheap to buy, and the results can be more than adequate.
I have used Por-Patch extensively as a filler and adhesive. So far it's been great. (I haven't had to sand it or paint it yet.)
Finally, I have visited the AutoBody Store Forum on more than a few occaisions. http://autobodystore.com/forum/index.php
Not too BMW friendly, but very knowledgable and certainly helpful.
Keep you posts coming. I'm really glad I'm not alone in the DIY efforts.
Post a Comment