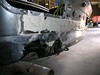
Today began like last week. Lots of sanding. This time I was more careful to look for the curve in the body as it wraps around under the tail light rather than blend the filler into the sheet metal. This takes time, but the idea is to avoid going too far and having to do it over.
The best way to do this is by feel, followed up by visual inspection. At first, when the filler is lumpy, it is hard to feel anything, but as the filler starts to smooth out the ebb and flow of the surface can be felt through the sanding block.
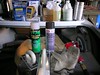
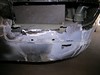
As I approached perfection I found it hard to see the highs and lows so I shot the area with Evercoat Acid Etching Primer. Supposed to help anchor paint to bare metal, and I had a lot of that, but what I was after was a continuous, single color surface that would reveal the high spots. This primer was a light tan color. To prep the area I did the usual POR-15 Metal Kleen and Metal Prep routine. The paint needed twenty minutes to dry, so I ate lunch.
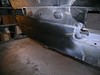
After more work on the high spots I decided to see how much help the other primer I had purchased would be in filling in the low spots. In my youth we used sanding primer, which was lacquer based. It had to be spayed from a gun, but it was dirt cheap and dried almost instantly. Using a gun where my E9 is now is somewhere between awkward and impossible, so I bought some aerosol cans of SEM High Build Surfacer Primer from Redline Automotive, the local auto paint supply. One can each of black, red and white, the idea being to alternate colors to help judge how far to sand. This stuff is supposed to work well with modern base coat/clear coat paint systems. It wasn't until after I had the first tack coat on that I discovered in has to dry for an hour before sanding. By then the shop would be closed.
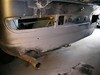
I decided to press on and paint the entire section I had been working on for the last month. I gave it three heavy coats and even though I was using a spray can there wasn't any drips or runs. Pretty good stuff.
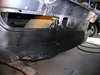
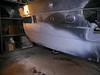
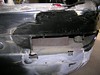
Since I was done sanding for the day I decided to get started on the right tail light. This one has even more rust damage than the left side. Virtually all of the lower flange is missing. There is a doubler on the inside where the bumper bolts attach which I can use to anchor the new skin, but to use it I would have to grind away the upper half inch of original but badly rusted sheet metal. I used the remaining time to do that, finishing with the Metal Kleen and Metal Prep treatment.
I think it is a good thing I got started on a new section. Now I can alternate between work sites while the other site is waiting on something to cure. It won't be long before I'll be attacking the front.
No comments:
Post a Comment