In his book "Positive Coaching" Jim Thompson descibes a similer situation, which he calls a coachable moment. In sports, there are times a player can receive instruction and times they can't. There is no point in trying to explain some fine point of the game when the athlete is not in learning mode. As a rule, game time is not learning time. Even during practice there are surprisingly few coachable moments. This is why so many coaches complain that their players don't listen, that what goes in one ear goes out the other. What makes a successful coach is the ability to spot those coachable moments and make the most of them.
My point is that when I get all spun up working on the car the effect is the same as being "in the game." If I am doing something familiar I can charge along without worry. It's when I am doing something unfamiliar that I need to resist the temptation to put on my game face, because that is when things are more likely to turn out badly.
As I was tweaking the right hand patch I ran into a problem getting the top edge of the patch to fit tight againt the opening. The problem turned out to be the original seam, which is about 1/2 in. back. I did not want to grind it flush because that could weaken that joint, which could make my patch fail in the future. At the same time I did not want to rely on spanning the gap with the welder. I decided to drill a series of holes through the sill, one per tab, on or near the seam line, and to weld through those.
This plan almost worked. For some reason the outboard end ended up with a little more gap than I had expected. The only explenation I have to offer is that I relaxed my grip on the rod lifting the piece into place before the weld puddle fully hardened. I ended up trying to fill in the gaps around the holes and along the edge. The result looks messy but it should have enough strength. I did not apply putty because I think I need more welds along the bottom.
One last item. Previously I mentioned getting a welding blanket to prevent setting things on fire. For this session I did a lot of welding, and when I was finished it looked as if a bunch of oily rust flakes had been dislodged by all the grinding. It turns out the spots on the blanket were burn marks. I even burned a hole in my pants. Anyone contemplating welding on a car should consider a welding blanket mandatory equipment.
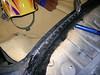
Second patch after initial weld.
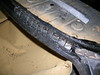
Another view showing welds through holes in window sill. Inboard hole (net to vise-grips) not filled in yet.
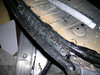
After filling in more of the gap along the top edge.
After a little grinding. I think I need some more welds along the bottom edge.
No comments:
Post a Comment