Short day today because at 4:00 my wife and I met with Frank and Laura Smith and the rest of the Hana Ride gang for a shake-down ride around Tantalus, in preparation for next weekend's ride to Hana. Which means I won't get any work done next weekend.
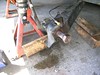
Fortunately today was one of those days when things go well. My goal was to get the hub on, so that the Loctite would have plenty of time to cure. I made it with a little time to spare, which I used for a much needed rest.
I started with installing the new braided steel brake hose. No problem there. On the RH side I left the steel brake line that runs along the top of the trailing arm in place. The LH side only had one clip remaining, so I removed the line to paint the trailing arm. Getting the line back into the clip was ridiculously difficult, but I managed.
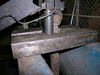
The real work was installing the forward bolt, the one the arm pivots on. The RH side was just hard. The LH side was as close to impossible as possible. The problem is the length of the bolt. Lotus should have made the cave in which all this takes place 1/8" wider, or used a slightly shorter bolt.
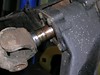
Since getting the hub on was the goal, connecting the brake hose to the trailing arm was not on the critical path so I left that for later and moved on to the brake backing plate. On the RH side I had a terrible time getting the four bolts threaded into the cast aluminum carrier. As luck would have it, only one on the LH side was a problem. All it needed was a lot of pressure pushing into the hole while gently turning. In situations like this, a steel bolt going to an aluminum casting, I always use anti-seize.
With the backing plate in place I could install the hub. Yes, I remembered the spacer! I thought I could do it without connecting the lower link, but before I got close to 150 ft. lbs. the hub was twisting more than I was comfortable with -- I did not want to damage the rubber mount -- so I stopped to put in the bolt that connects the lower link to the hub carrier. I did not need it tight, just in the hole. It was very hard to get out, and today, again, it was very hard to put in. I need to check that out next time.
Sunday, August 16, 2009
Sunday, August 9, 2009
Lotus rear hub bearings, pt. 6
The big excitement around here has been the approach of hurricane Felicia. On Friday it was a Cat 4 southeast of the Islands, on course to roll right over us. As it moved north the ocean temperature fell, so it is now a tropical storm. By the time it gets here it may well be a tropical smoothie.
My goal for today was to get the suspension assembled and in. I knew it was a stretch, and it was. I got as far as getting it ready to install. Even so I'm not disappointed.
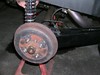
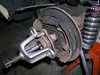
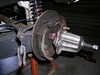
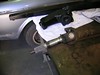
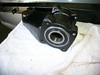
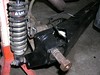
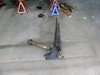
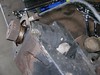
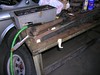
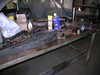
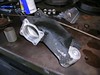
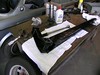
I have some pics from previous work. First off are two pics of the backing plate installed, and at last is a shot of the RH side ready for its wheel. Think of it as closure.
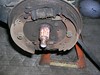
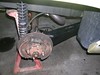
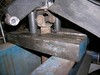
Removing the RH hub was a lot harder than the left. I had to use a heat gun to heat the hub to break the Loctite (as described in the workshop manual). Even then, getting it off was a battle. I did not want to use my lug nuts with the puller for fear of damaging them, so I dug up some junk nuts and washers. The washers were destroyed in the process. In the last pic the remains of the Loctite is clearly visible on the splines.
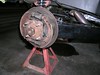
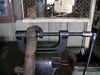
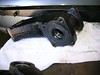
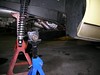
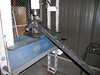
Today I took a few more pics of the u-joint removal, because the last ones I took did not show the best technique. It works better to clamp the press in the vise. Each time a bear cap was almost out I stopped pressing, clamped the cap in the vise, and tapped the yoke up and off. Another trick was to use a socket to take the place of the first cap removed, so that pressing back against the second cap doesn't push the spider off-center and crack the cap. Which it was.
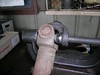
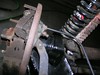
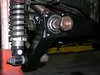
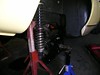
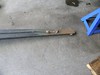
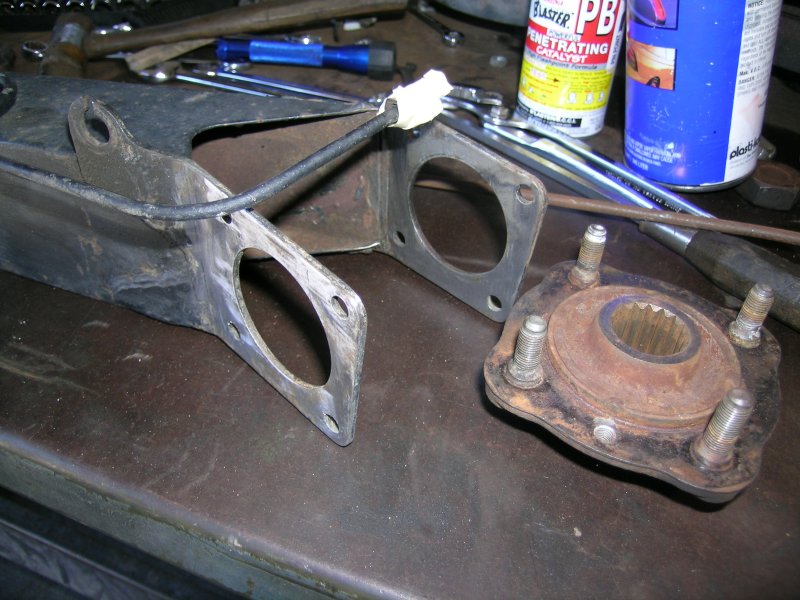
Lastly, a few pics of the painted trailing link and hub with the bearings in, and a pic showing how I pulled the drive shaft into place.
Next time will begin with installing the brake pipe -- I'll need to buy some long cable ties -- and installing the new braided steel hose.
My goal for today was to get the suspension assembled and in. I knew it was a stretch, and it was. I got as far as getting it ready to install. Even so I'm not disappointed.
I have some pics from previous work. First off are two pics of the backing plate installed, and at last is a shot of the RH side ready for its wheel. Think of it as closure.
Removing the RH hub was a lot harder than the left. I had to use a heat gun to heat the hub to break the Loctite (as described in the workshop manual). Even then, getting it off was a battle. I did not want to use my lug nuts with the puller for fear of damaging them, so I dug up some junk nuts and washers. The washers were destroyed in the process. In the last pic the remains of the Loctite is clearly visible on the splines.
Today I took a few more pics of the u-joint removal, because the last ones I took did not show the best technique. It works better to clamp the press in the vise. Each time a bear cap was almost out I stopped pressing, clamped the cap in the vise, and tapped the yoke up and off. Another trick was to use a socket to take the place of the first cap removed, so that pressing back against the second cap doesn't push the spider off-center and crack the cap. Which it was.
Lastly, a few pics of the painted trailing link and hub with the bearings in, and a pic showing how I pulled the drive shaft into place.
Next time will begin with installing the brake pipe -- I'll need to buy some long cable ties -- and installing the new braided steel hose.
Sunday, August 2, 2009
Lotus rear hub bearings, pt. 5
It's been awhile since I wrote anything. Mostly this is a result of a crazy busy schedule, but health issues have played a part, too. This week, both are back to almost normal. Another reason is that I have been working on the Europa's left rear wheel bearing, which is a repeat of what I just did on the right side. On top of that I am busy re-learning the Smalltalk language and a new version, called Squeak, my goal being to teach a class of high schoolers. This is in conjunction with the Open Slate Project.
Something not a distraction but noteworthy is news that my eldest son has flown the coop. Gone away to California to make his fortune. He got a job a bazillion kids want, to be a game designer at Upper Deck. That business segment has seen some rough water this past year, so I gave him a pep talk about being on the team that turns things around. I wish him and the company all the best. He currently has a blog up about his adventures; don't know how long it will stay up.
Last week I got the trailing arm off the car. A bit of a snag getting the forward brake line off, I ended up disconnecting the top. For some reason, corrosion most likely, the long bolt that secures the lower link to the hub carrier was hard to remove.
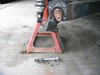
Today began with pressing the drive shaft out of the bearings. It provided a first-hand example of the value of this blog -- I could go back and review the press setup I used on the other side. I tried to do it myself, but juggling the part and four long sockets was too much, so Carl gave me a hand.
I was going to jump right in on the universal joints until I realized that paint was on the critical path. I set aside the drive shaft and instead knocked the bearings and seal out of the hub carrier, cleaned it in the solvent wash, then did the whole long clean and prep drill on it and the trailing arm in preparation for paint. As I recall, last time I painted the inside and outside of the trailing arm on different days. Today I did both, inside first. Once again my solution was to pour Rustoleum straight from the can into the trailing arm, then turning and twisting to coat the inside. Messy but effective. After hanging up like a smoked ham for an hour the paint stop dripping out the end, and I sprayed it and the hub carrier. They will be ready to assemble next week.
Even if I get everything put together next Sunday I will not be able to drive the car, because the Loctite has to set overnight before putting a load on it. Maybe I can take a day off this week and at least get the hub on. Too bad that step happens so near the end.
Something not a distraction but noteworthy is news that my eldest son has flown the coop. Gone away to California to make his fortune. He got a job a bazillion kids want, to be a game designer at Upper Deck. That business segment has seen some rough water this past year, so I gave him a pep talk about being on the team that turns things around. I wish him and the company all the best. He currently has a blog up about his adventures; don't know how long it will stay up.
Last week I got the trailing arm off the car. A bit of a snag getting the forward brake line off, I ended up disconnecting the top. For some reason, corrosion most likely, the long bolt that secures the lower link to the hub carrier was hard to remove.
Today began with pressing the drive shaft out of the bearings. It provided a first-hand example of the value of this blog -- I could go back and review the press setup I used on the other side. I tried to do it myself, but juggling the part and four long sockets was too much, so Carl gave me a hand.
I was going to jump right in on the universal joints until I realized that paint was on the critical path. I set aside the drive shaft and instead knocked the bearings and seal out of the hub carrier, cleaned it in the solvent wash, then did the whole long clean and prep drill on it and the trailing arm in preparation for paint. As I recall, last time I painted the inside and outside of the trailing arm on different days. Today I did both, inside first. Once again my solution was to pour Rustoleum straight from the can into the trailing arm, then turning and twisting to coat the inside. Messy but effective. After hanging up like a smoked ham for an hour the paint stop dripping out the end, and I sprayed it and the hub carrier. They will be ready to assemble next week.
Even if I get everything put together next Sunday I will not be able to drive the car, because the Loctite has to set overnight before putting a load on it. Maybe I can take a day off this week and at least get the hub on. Too bad that step happens so near the end.
Sunday, July 12, 2009
Lotus rear hub bearings, pt. 4
Last week was a bust because I was suffering from a bout of vertigo. I've had it before, and I'll have it again. It actually started the Sunday before, but I just thought it was the result of all those trips under the car. I was good enough to ride on Saturday, but Sunday it was back. Today I still felt a little woozy, but I could work well enough.
The first thing to do was to hook up the brake line. Only reachable from under the car, very little room, completely hidden. My wrenches were too long to turn in the limited space so I resorted to a pair of stubby metrics the shop has. I could just get the 9/16 flare nut wrench to turn by flipping it, going half a flat with each swing. When I was done the brake pipe had turned with the flare nut, throwing it out of alignment at the back end. I had to pre-position it out of alignment so that it ended up aligned.
Next thing was the brake back plate. Four bolts threaded into tapped holes in the hub carrier. What could be easier? Well, the holes did not like up. Was it by design, the result of years of use, or a case of sloppy fabrication? After lots of head scratching I ended up putting in the one bolt that fit and tightening it, in hopes it would flatten the portion of the trailing arm between the backing plate and the hub carrier. It worked. Normally for a situation like this you put in all the bolts loose, then tighten. This was the exception.
The final job for the day was to install the hub. I did a dry run without thread lock and without torquing the nut, to make sure everything was ready. I wiped down the splines with alcohol to remove any oil, then assembled it with thread lock -- on the splines, nit the threads -- and torqued the nut to 150 ft. lbs.
Sunday, June 28, 2009
Lotus rear hub bearings, pt. 3
The inner u-joint was a lot less trouble until the very end, but it was still a fight. One bearing ended up a tad tight. I hope this does not rob too much power!
By the end of the day I had istalled the driveshaft in the hub bearings, attached the inboard end of the driveshaft to the transaxle, and installed the forward trailing arm bolt. There were two shim washers between the mount and the trailing arm. In place of the roll pins on the driveshaft coupling I use precision ground AN bolts and self locking nuts.
First thing to do next time is to reconnect the brake hose.
Sunday, June 21, 2009
Lotus rear hub bearings, pt. 2
Happy Father's Day!
When I got home from the shop today I was treated to the most fantastic dinner, made all the better by having both my sons there. There was Kirin beer, steak, pepper cured bacon, two kinds of sausage, tomato and artichoke salad, summer squash, and rice pilaf. Dessert was a mocha chocolate pie. There are very few restaurants in Honolulu that could match that meal, at any cost. Pattie really outdid herself.
If there is one thing you can count on when working on old cars, it is that everything takes much longer than it should. By the start of today I had
Last Week I was ready to install the trailing arm when I decided to grease the u-joint. Simple. Only I could not get the grease gun fitting off of the nipple. The effort ended badly, as it so often does with old cars, when the nipple broke off. Up to that point I had decided against replacing the u-joints, but they are twenty years old and rather stiff, so that was the last straw. I ordered new bears from Dave Bean.
Today I figured I would spend an hour replacing the bearings, then continue putting things together, and at the end of the day I would face the problem of having two cars to drive home. Not a chance. By the end of the day I had one u-joint installed. Getting it apart was such an ordeal that I am glade I did not attempt it on the car, as I had planned. The big time killers were broken snap rings, cracked outer races, and filing the gouges created while taking it apart.


When I got home from the shop today I was treated to the most fantastic dinner, made all the better by having both my sons there. There was Kirin beer, steak, pepper cured bacon, two kinds of sausage, tomato and artichoke salad, summer squash, and rice pilaf. Dessert was a mocha chocolate pie. There are very few restaurants in Honolulu that could match that meal, at any cost. Pattie really outdid herself.
If there is one thing you can count on when working on old cars, it is that everything takes much longer than it should. By the start of today I had
- Removed the entire trailing arm
- Pressed out the drive shaft
- Removed the hub carrier
- Removed the bearings and seal
- Painted the trailing arm and hub carrier with Rustoleum
- Replaced the brake hose
- Pressed in the new bearings and seal
- Mounted the hub carrier
- Installed the driveshaft into the bearings
Last Week I was ready to install the trailing arm when I decided to grease the u-joint. Simple. Only I could not get the grease gun fitting off of the nipple. The effort ended badly, as it so often does with old cars, when the nipple broke off. Up to that point I had decided against replacing the u-joints, but they are twenty years old and rather stiff, so that was the last straw. I ordered new bears from Dave Bean.
Today I figured I would spend an hour replacing the bearings, then continue putting things together, and at the end of the day I would face the problem of having two cars to drive home. Not a chance. By the end of the day I had one u-joint installed. Getting it apart was such an ordeal that I am glade I did not attempt it on the car, as I had planned. The big time killers were broken snap rings, cracked outer races, and filing the gouges created while taking it apart.
Monday, June 8, 2009
Lotus rear hub bearings, pt. 1
Yesterday was another all Lotus day. While changing the oil last week I investigated the squeak coming from the right rear wheel, and sure enough it was the dreaded worn wheel bearings. I ordered new seals and bearings for both sides from Dave Bean and they arrived mid-week (what great service!) so I got right to it. Polishing out the flaws in the clear coat will have to wait.
I have had the rear suspension off many times, but I have never done the hubs. It is a job that is notoriously difficult because the hub is installed onto the splined drive shaft with Loctite, and the book recommends heating the hub carriers to remove the bearings ... which means they are a really tight fit.
My first battle was trying to remove the brake drum. This is always hard. I really should design some sort of puller. As I pounded and tugged I could see that the hub was moving on the splines, which was weird, so I opted to take drum off with the hub. Worked like a charm. Once off I just tapped the hub off the drum.

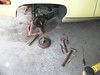
The stopper was in trying to remove the drive shaft from the bearings. It has to come off before the four bolts on the inboard side can be removed, at which point the hub carrier can be slid off the trailing arm. I hit it as hard as I dared, but most of the force was lost due to the hub carrier flopping around.
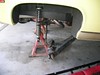
I knew my friend Patric has done this before, so I called to ask his advice and he recommends removing the trailing arm from the car and using a press. I hope to continue when the shop opens on Wednesday.
As for rust, the subject of this blog, the Lotus had a lot of light surface rust breaking through the steel frame and trailing arm. When I restored the car I wire brushed these areas and painted them with brushed on Rustoleum. I must say, all those places look great. The paint is strong and no signs of rust.
As for the starting thing, thr car started fine after sitting all week, and started right up after a stop at NAPA for some Castrol LMA brake fluid. Go figure.
I have had the rear suspension off many times, but I have never done the hubs. It is a job that is notoriously difficult because the hub is installed onto the splined drive shaft with Loctite, and the book recommends heating the hub carriers to remove the bearings ... which means they are a really tight fit.
My first battle was trying to remove the brake drum. This is always hard. I really should design some sort of puller. As I pounded and tugged I could see that the hub was moving on the splines, which was weird, so I opted to take drum off with the hub. Worked like a charm. Once off I just tapped the hub off the drum.
The stopper was in trying to remove the drive shaft from the bearings. It has to come off before the four bolts on the inboard side can be removed, at which point the hub carrier can be slid off the trailing arm. I hit it as hard as I dared, but most of the force was lost due to the hub carrier flopping around.
I knew my friend Patric has done this before, so I called to ask his advice and he recommends removing the trailing arm from the car and using a press. I hope to continue when the shop opens on Wednesday.
As for rust, the subject of this blog, the Lotus had a lot of light surface rust breaking through the steel frame and trailing arm. When I restored the car I wire brushed these areas and painted them with brushed on Rustoleum. I must say, all those places look great. The paint is strong and no signs of rust.
As for the starting thing, thr car started fine after sitting all week, and started right up after a stop at NAPA for some Castrol LMA brake fluid. Go figure.
Subscribe to:
Posts (Atom)