Looking over today's pics I am not happy with how some turned out. They are not sharp. My experience tells me that even a hand-held shot should be sharp, because the exposure comes from the flash, which is faster than a shutter speed of 1/1000. What I think is happening is that the V-1 computer sees that ambient light can furnish most of what is required, and reduces the intensity of the flash. Meaning that camera motion is still an issue. I will need to hold the camera better in the future, especially when ambient light is rather bright.
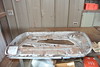
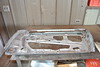
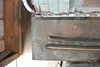
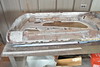
On my way home after last week's session I realized I hadn't taken a picture of the door as it sat at the end of the day. So, my first order of business today was to take that picture. Four, actually. The first is with the top on the near side, the second is the other way around, followed by a couple views of the ends.
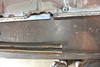
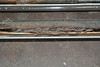
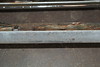
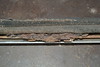
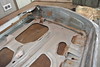
The patch I need to make will run along the top outside edge of the window opening. This is where the frame and the skin have a flange, or tab, facing upwards. A heavy chromed trim piece presses down onto this tab. The same piece holds the window glass cushion, made of felt glued to thin aluminum. I need to be sure my patch down not interfere with this trim piece, so I spent some time reviewing how it all fits together.
This short video is a hand-held scan along the trim piece in the photos above. Sometimes seeing something like this as a video reveals details that do not come across as easily in a still shot.


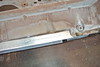
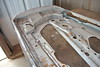
When I had my plan, all I had to do was lay out the patch, cut it, and flange it. The frame will be cut down by roughly 0.5 in. and the patch will overlap the remaining tab. The patch is flanged (used my pneumatic flanger) so that the new portion will be in-line with the old. The flange will go on the side away from the window.
Next step is to cut out sections of the patch to clear some bumps in the frame. I suspect a little more work will be required in the neighborhood of the outside door handle.
No comments:
Post a Comment