On the Saturday before Mothers Day I decided that whatever was wrong was not getting better on its own so I took her to the vet. The blood tests indicated significant loss of kidney function. The only thing they could do was admit her and put her on an IV to try to dilute her blood enough to give her kidneys a chance to catch up. I visited her first thing Sunday morning, then went to the shop as usual, then straight on to dinner at my mother-in-law's house. No time to write my blog entry.
On Monday morning I went to visit her again, only to find out she had passed away over night. Not a surprise, yet sad nonetheless.
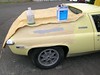
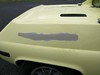
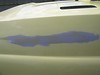
What I accomplished last week was to apply a coat of high-build primer to the Lotus. It went rather well, but after a lot of wet sanding with #400 paper I still had some spots with tiny air bubbles, probably caused by applying too thick of a coat. I also took off more primer than I should have at the rear end.
While waiting for the paint to dry I did more grinding on the E9 RH tail light patches. I finally got around to grinding down the lower-left inside corner, giving it a nice radius. In the end a few places needed more epoxy filler. Somehow I managed to not get a picture of this, but I did take some of the paint work.
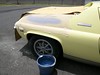
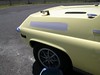
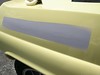
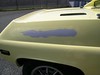
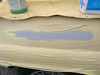
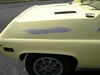
Today the goal was to fix the air bubbles and end up ready to shoot color. I think I made it. I used brown to help show how far down to sand. Just after the first coat flashed off it started to rain, but after a couple hours the sun came back and it turned out fine.
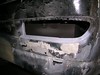
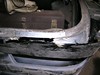
While I was waiting for the rain to stop I decided to get started on the rusted out area above the RH tail light. This spot extends into the flange that forms the truck opening lip, a rubber gasket runs in the flange. Lots of curves here. After all the trouble I had fabricating the rear windowsill patch I decided to build this one up. I worked on the piece that forms the bottom of the flange (hard to describe since the "bottom" is angled about forty-five degrees. First I made a cardboard pattern, then cut the sheet metal with a die grinder and ground that to the final shape. As I was fitting it I discovered that in addition to having curved edges top and bottom (it's about 0.75 in. wide) it needs to have a twist in it. I'll start with that next time.

No comments:
Post a Comment