
In the same photo is the tub of micro-balloons I bought to thicken POR Patch, and a bottle of POR-15 solvent. The micro-balloons are used in fiberglass work. Finding the putty may make this solution OBE, but I want to try it. I got the solvent because both times I painted with POR-15 my latex gloves leaked and I had black fingers for a week.
I must admit I was surprised to discover that the patched areas from last week were incredibly strong. I thought I would be able to push the paint right out of the small holes, but no such luck. POR-15, including the patch stuff, cures to something like phenolic. I pressed really hard with my fingernail and did not leave the slightest impression.
I decided that the best way to use the putty would be on top of a POR-15 base coat. Otherwise any rust remaining under the putty would continue to spread, weakening the foundation and eventually breaking through the surface. Maybe, maybe not. So today was about preparing a place to try the putty. I won't be able to try it until next week.
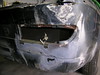
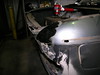
The area I chose is above the RH rear tail light. There are several small rust-throughs I thought might be suitable. To find out I had to grind away the thick layer of filler and primer that seems to be all over this car. Sure enough, what appeared was a perfect place to continue practicing the POR-15 application sequence that would provide a few places to try the putty.
After grinding away the first section of filler just above the tail-light I paused to take a picture, to show how thick the finish is. I don't thing the photo captures how much junk is on top of the sheet metal. I think the rust-throughs are an example of what happens when bondo and filler were used to repair damage. Even the best top coat is not waterproof. Eventually enough moisture can leach through the paint to reach the steel. Left untreated, it slowly starts to rust. Not so much deeper as spreading out. As I ground out the rust-through I would extend the area, exposing a thin layer of rust under the primer. I kept going, and eventually the metal under the primer was clean.

The next set of photos are after I treated the area with Metal Ready. This time I worked extra hard rinsing after using Marine-Clean, the super-detergent degreaser, but again I got bubbles what I applied Metal Ready. I hope it does not interfere with the process. I didn't bother taking a final photo; just imagine the treated area all shiny and black, and you've got it.


This time I used double gloves, and not a drop got through. But, stupid me, after everything was cleaned up I decided to get back to my shrinker tool, which meant moving the paint pot, which had drips running down the outside. So I got to test the solvent, and it works fine.
To recap, I spent about an hour grinding, ten minutes to apply Marine-Clean, fifteen minutes to rinse (a lot of trips to the sink to get clean water), a break to let it dry followed by a heat gun to finish the drying, fifteen minutes to apply Metal Ready, going around and around to keep it wet, then break for lunch. After lunch I hit it again with the dryer to ensure a bone-dry surface (rust soaks up liquids), ten minutes to paint. The trick is to clear the right amount first, and today I got it just right.
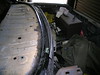
With the painting done I used the rest of my time, about an hour, tweaking the rear window patch. I finally trimmed the ends a bit. Not to final size, but enough so that I could lay the piece closer to where it will end up. It was back and forth between the shrinker and stretcher, starting with the stretcher to undo some of last week's effort. In the end I was a lot closer, but there is still a little tweaking to do. The piece still has a twist to it, which I never could control with the new tools. I got out most of it just twisting it -- it is steel, after all. I am more worried about a little arch that may have crept in. In other words, the piece is now almost perfect viewed from above, but viewed from the back the upper edge might be high compared to the ends. More next week. Maybe I'll even weld it in!
No comments:
Post a Comment