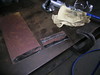
After cutting off the end of my previous practice weld with a die grinder and cut-off wheel I used my grinder to smooth the edges and polish off most of the surface rust. The next time I do this I will paint the exposed surfaces with weld-through primer, which is supposed to help prevent rust in the joint. I also foresee a role for POR-15, brushed liberally along the joints after welding.
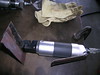
This is my pneumatic flanger. Got it at Harbor Freight. I will use it to bend an offset along the edge of this piece. In practice this will most likely be the edge of the original sheel metal.
At this point I ran into a problem. My nice new flanger would not flange. After a lot of fiddling around I discovered that the swivel head -- the black piece -- does not exactly swivel. It threads onto something inside. I had swiveled it enough to unscrew it enough that the jaws no longer met. All it took was a few clockwise turns and I was back in business.

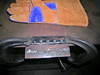
After flanging. The new flange is on the left.
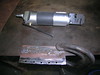
The flanger also has a hole punch, located closer to the body. Here I used it to punch holes one inch apart, which is about the same spacing BMW used for the spot welds around the rear window opening. You can see four of the punched out bits laying on the table. They exit through a hole at the end of the head, which is to the right in this picture.

For my previous practice I just laid the two pieces on the table. This time I decided to clamp them tightly together. The warp might be from the flanger, but I think it was from the heat from my previous welding practice. Something to watch out for.

All clamped tight and ready to weld.
After welding. Sorry, no pics of me in my welding regalia. For that I'll need someone else behind the camera. I held the gun closer to the work than before, about 1/2 inch, and held it on each spot for about five seconds. Each hole was completely filled. This is the first weld I have made that I consider good enough for the car. Notice how clean the welds are, with no flux residue. All those recommendations to use shielding gas were right.

The flip side. In practice this will be the outside. There is a mild, blue burn mark at each weld spot, which I think indicates proper weld penetration. The joint was absolutely solid.
Today I decided to practice welding with the work vertical, which is how it will be most of the time on the car. I have had people tell me that vertical welding is a lot harder. They were wrong. I laid down several perfect beads in the clear area next to the weld spots, without any problems whatsoever. Nice smooth beads with no splatter and good penetration.
Inspired by my success, I laid out and made the first bend in the piece that will replace the rusted section under the rear window. (See "I Have a Life," Oct 12, 2007). I was in a rush so I did not take any pictures. My bad. I used a heavy U-channel piece that was originally a bumper, and suprisingly straight, to clamp my sheet metal to the steel table with 9/10 in. hanging over the edge. I bent that part down by whacking it with a big hammer and a piece a 2x4 wood to spread the impacts. Many, many impacts. If the result needed to be straight this would need to be done on a brake, but since the result will be curved, which means a lot more hammering, a little stretching is not a problem at this point. The important thing is to have the two bends the correct distance apart, and the correct angle.
The shop will be closed this Sunday and again on Wednesday, along with the usual Monday and Tuesday. The next chance I'll get to work on the car will be Thursday.
One last thing. I went shopping yesterday for a cart to put my welder on. The best place in Honolulu to get that sort of thing, Kilgo's, closed a few months back. I went to Home Depot and the only thing they had was made of plastic. The good news is it won't rust out. The bad news is, welding sparks will burn holes in it. I think Sears Craftsman has what I want. I should watch for an after Christmas sale.
No comments:
Post a Comment